104 results found with an empty search
- Toaroha Range
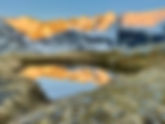
Date: December 19 - 23, 2023 Location: Toaroha Range, Canterbury Westland Alps, Hokitika, West Coast, New Zealand Total Trip Distance: 31.5 mi / 50 km Total Elevation Gain : 10,417 ft / 3,175 m Trip Duration: 5 days Team: Solo Field Notes: A stunning trip into the rugged and remote mountains of the West Coast. Trails here are rough and I moved significantly slower than I normally do. Expect constant ups and downs if following riverbeds and be extremely careful in heavy rain. Travel to gain the ridge-lines is borderline bushwhacking - and the forests here are thick. I saw three people in 5 days and had only 1 day of rain! One of the most magical trips of my life. Rating: Hiking / tramping, off trail Download GPX File Google Maps Location “Why’d you come out?” I sat around a $100,000+ RV set up with a mug I bought at a second hand store decorated with cats, filled with sleepy time tea. I stumbled with my answer… ”I don’t know…” I pulled into the free camping spot when two legendary Kiwi’s, Buck and Adam, showed up with their family entourage. Adam probably felt bad for me that I was sitting in my soaking wet tent so he invited me over. I was introduced to everyone, however Buck stood out. He was Kiwi, well traveled, loved women, hunting, drinking beer, and teaching his son to get up when he got knocked down in rugby. A man in every sense of the word. Fucking legend. I was trying to explain my trip across the Toaroha Range when he asked me point blank - “why did you come out?” I honestly have no clue. Even as I write this I'm sitting next to a roaring fire above a babbling brook in Mount Aurum. Tomorrow I walk out. Why am I going out when I want to go IN? This is the duality of life. One naturally creates the other. Toaroha Range from Genoa Peak On day one I walked in to Cedar Flat hut. There were only a few cars in the lot and I had a feeling I wasn’t going to see many folks on this one. I’d dreamed about the West Coast for years. Rough mountains and foul weather. It seemed only by the grace of God that one got sunshine here. Lo and behold a perfect forecast struck the West Coast and I drove the six hours to Hokitika. I knew I was going to be in for a good one when I arrived at Cedar Flat hut under the cover of darkness and stumbled into a kiwi brushing his teeth. His accent was thick - no doubt a country boy. He showed me around the hut only to tell me he’s got a rifle on the top bunk and that I shouldn’t be spooked. No worries I told him, fire away . Are you hunting? No, he told me. Are you training? No, he told me. Beats me I thought to myself and went outside to cook dinner under the stars. That night I slept very deeply. On day two I took my damn time. It was a glorious morning. Absolutely bluebird without a cloud. A Polish couple were the only other people in the hut and they told me the hot springs nearby were some of the best they’ve ever been to - and hot springs are their life passion. What are the odds? I hiked the fifteen minutes to the hot springs and I can confirm that it was a borderline religious experience. The hot springs sat on the edge of a freezing cold mountain river. And the hot springs were HOT. I spent about an hour doing multiple rounds of hot cold therapy, all alone, on a perfect bluebird morning on the west coast. Holy shit. At eleven I pulled myself from the hut and figured I should start moving. As I worked up the Toaroha River I realized travel in this neck of the woods was going to be very, very slow. The trails out here are the roughest I’ve ever seen. My original goal was to get to Toaroha Saddle but after three hours of non-stop up and down along a riverbed, I decided to change my plans and I am so glad that I did. First off, it was going to take me a solid seven hours of very hard travel to get to the saddle. This would mean days three and four would be very big days, and I didn't want to be up on the ridge in poor conditions in an area I don't know. I knew rain was coming, and I wanted to get on the tops and experience the ridges in good weather. I decided to take a left and head up to Crystal Biv. This decision was the turning point in the trip. After a borderline bushwhack for an hour and a half I broke treeline and reached the Biv. The views were absolutely stunning. The Diedrechs Range behind me and the Toaroha Range looming above. The Biv was nestled into the shrub like a baby tucked into a cradle. It felt wild to be up here. I wandered down to the tarn and took an amazing skinny dip. The forecast for tomorrow was calling for perfection and I couldn’t wait to get to the tops. That night I slept like a log. Nine hours later I woke to the sound of chirping birds. I looked out the window and my eyes locked on blue sky. I ripped open the door to perfect conditions. I was like a kid on Christmas and made no delay - it was time to get going! Sunrise at Crystal Biv I climbed up through snow grass and into the cloud layer that had blanketed the ridgeline while I was getting ready. This was just an inversion layer and waited patiently to break through. At 1400 meters I finally climbed above the cloud layer and got my first few of the Toaroha Range - wow. Golden light covered the deep green ridglines and baked the clouds. It was a magical sight. I continued to climb higher, sidling gendarmes along the ridge by negotiating steep scrub. Travel continued to be slow and challenging , and I finally reached my first high point at Point 1694. The sun was screaming hot and I was melting. After a thirty minute break I sank back into the clouds and finally reached Zit Saddle, roughly 4 hours into the day. I had a very long way to go and kept moving. I found a tarn below Mount Reeves, refilled my water, broke above the clouds again, and stood atop the high point of my trip. Mountains surrounded me in all directions and I was all alone. The feeling was special. I took another long break before descending to the col below Point 1618. It got quite steep along the ridge that required a down climb to the climbers right to bypass. Travel from here to Genoa Peak was arguably the most stunning of the whole day. I was entirely above the clouds, watching the inversion layer pour over the mountains into the Toaroha Valley. To the right, the snow capped peaks of Arthur’s Pass loomed on the skyline. In front of me, Genoa Peak and The Pinnacle looked wild and rugged. In what felt like Arabian desert heat I continued on. I debated skipping Genoa Peak but remembered the conversation I had with myself earlier… “you will want to skip this peak but you will regret it!” So I began my final ascent of the day. I was feeling quite shitty from the heat when I crested a hill and ran into a beautiful alpine tarn. “OH MY GOD!” I stripped off all my clothes and dove right in. I couldn’t help but laugh out loud - what a mystery life is! Tarn below Genoa Peak Totally recharged I sprinted to the top of the peak and with misty eyes rejoiced at the magic of life. I felt so grateful to be up here. I could see Pinnacle Biv in the valley below, my home for the night. It took me about an hour or so of frustrating terrain to reach the hut. Because Crinkle Top (I can’t believe this is even considered a mountain) lay just fifty meters from the hut I dropped my pack and ran to the top. Finally, nine hours later, I arrived at the Biv. And what a place it was - above a sea of clouds staring at the mountains of Arthur’s Pass. This day will remain as one of the top days I’ve ever had in the hills. Stunner - Pinnacle Biv On day four I decided to have a casual day and wander down to Boo Boo Hut. It was a rainy day and the hut had a wood burner, so why not spend an extra day relaxing and enjoying the warmth of the fire? It took rough two hours to reach the hut. I spent the day chopping wood, cleaning up the hut, reading, and doing cold plunges in the natural pool nearby. It was dead silent besides the sounds of local birds, falling rain, and the occasional wind blowing about the trees. This time of stillness gave me a much needed break from the constant doings of life. The rain had lifted a bit on the morning of day five. I took a final cold plunge in the pool, packed my bag and made the walk out. I was filled with passion and fire for life. That feeling of completing a spectacular trip in the wild recharges the soul like nothing else! I walked non-stop for four hours to reach my vehicle, passing through spectacular forest and deep gorges. The West Coast of New Zealand is one of those places in the world that will forever live untamed, wild, raw, and spectacular. I feel very fortunate to be able to complete such a trip in good weather. Happy days... Note: for more detailed information on West Coast huts and routes, visit: https://www.remotehuts.co.nz/
- Mount Barth
Date: November 24 - 25, 2023 Location: Huxley Range, Ahuriri Valley, Ohau Landsborough, Otago, New Zealand Total Trip Distance: 23 mi | 37 km Total Elevation Gain : 6,950 ft | 2,118 m Trip Duration: 2 Days Team: Solo Field Notes: An excellent grade 2 climb with easy access from the Ahuriri Valley. There are multiple bivy rocks in Canyon Creek so leave your tent at home. I climbed a variation of the south face to the east ridge where it maxs out at 48-49 degrees. An alternate (and potentially faster) descent route would be directly down the south face proper which would generally require a rappel over the berschrund. Seasonal conditions will dictate a lot on this climb. Rating: II, 2+ Download GPX File Google Maps Location I've never slept well the night before an alpine climb. Why would this time be any different? The wind had finally died off and left me alone to face a God that has existed before my family's family had been here, and will be here well beyond whatever bloodline I leave behind. I decided to pull myself from the warmth of my sleeping bag, climb out of the bivy rock and take one last look at it. The moon was almost full and the sky clear, and the mountain was lit up perfectly. "Oh my god..." I muttered to myself. What a mountain. The beautiful Mount Barth Mount Barth stands at 2,456 meters and completely dominates Canyon Creek. The access is relatively straightforward. On Friday I left Lake Hawea and drove over Lindis pass until taking a left towards Birchwood. I've never been up the Ahuriri Valley before. A sealed gravel road follows the valley north while huge mountains dot the skyline. After thirty minutes of driving, the 2wd road ends at Birchwood Station and becomes a 4wd road. If your car does not have clearance, you will for sure destroy it. And biking to the trailhead doesn't seem worth it unless you have an extra day. Makes sense to get a 4wd for this one. I reached the trailhead parking and didn't waste any time, I was ready to go. The weather was clearing as predicted and I felt very optimistic about this climb. Typically my intuition before a trip tells me a lot. Note: it's not a feeling of "positivity" or "excitement" (which is how I used to make decisions), but rather a feeling of alignment between myself (physically, mentally, emotionally, my skills) and the mountain (weather, snowpack, route conditions, etc.). One thing I am also constantly telling myself is that truly, the summit does not matter. I am an unchanged person regardless of wether I summit or not. For climbers, this is hard to accept. But when has a summit changed me? I have summited close to 150 peaks in my life and the glow, the thrill, the euphoria of every single summit has always worn off - leaving me to want another one. Just like a drug addict. Does this mean I should not climb because I'm an addict? No, because this is the nature of the mind. The mind is a drug addict . It craves. For me, it is simply the awareness of this. I will go on spending time in the mountains because it is something I love in its purity, but I will not be fooled into thinking a summit means more than it is. The track up Canyon Creek is a beauty, but not necessarily straightforward. There was quite a bit of blown down on the track and I had to oscillate between the river and the track. It took me four hours to reach the bivy rock and it did not disappoint. It as completely flat and someone had laid down straw which keeps dirt off belongings and such. The views of Mount Barth were simply incredible. I soaked my feet in the nearby river and prepared dinner. My plan was to be up very early and beat the heat. The forecast for Saturday was meant to be very hot and I didn't want to be up on that mountain while it was heating up. My alarm woke me at 3 am. I think I slept for a total of one hour. The excitement of the climb was too much and no amount of box breathing could get my nervous system to totally relax. The wind had died off around midnight and it was cold. From camp the route looked to be in absolutely perfect condition and I had visualized it one hundred times. I couldn't wait to go climb it. I made a quick coffee and set off at 3:45. What a gift to walk towards the heavens under starry skies. I crossed the glacial fed creeks and picked my way up through the tussock on the climbers right hand side of the valley which provided easy access to the snow slopes above. I donned crampons and an axe and climbed towards the sharks fin looking rock which gave access to the glacier. The snow was perfect. My confidence rose. At this point I had already climbed 650 meters in elevation and was moving well. I traversed across the glacier until I met my route up the south face. I wasted no time and zig-zagged up the slope. As I neared the choke on my route, things steepened and I took out my second tool. When I got to the choke (which I thought was going to be the crux), I realized that just above it actually got slightly steeper. My pulse quickened and a flash of anxiety swept across me. I locked in on my tools and body movements. One, two, three, four... Above the choke the route traverses up and climbers left above a set of cliff bands, where a fall would be impossible to stop and death likely. I measured the slope at 48-49 degrees which is quite steep. Again, I brought my attention back to my tools and body movements. The sound of my tools and crampons making contact with the perfect snow sent me into a hypnotic state. I was fully immersed in the moment, realizing my mortality but also in a state of calm clarity. A connection between body, mountain, and soul. As I topped out on the south face I stepped into the sun on the east ridge. I allowed myself a moment of pleasure and kept moving. The mighty Southern Alps The route follows the east ridge until a necessary traverse back across the south face to gain the summit. This was the second crux of the route. I laid into the face with my tools in the dagger position, focused obsessively on each individual movement. A quick look down reminded me that a fall would be quite bad. Sidling across steep exposed slopes on the south face to gain the summit I kept traversing until I topped out above the couloir on the true south face route. The summit was right there! The wind had picked up significantly and it got very cold very fast. I angled up and to the left, taking my final steps to the top of the peak. Three hours and forty minutes since leaving camp and I was on the summit of Mount Barth. I put on mittens with hand warmers on the inside, a buff, and my puffy jacket. The wind was absolutely ripping and there was not going to be a summit party. I knew my route back across the face was going to be just as precarious as on the way up and I didn't allow myself to turn off. I snapped a few photos, sat on the cold snow, and tried to soak in the moment. The summit of Mount Barth - an ocean of peaks After fifteen cold minutes on the peak it was time to go. I took the same route back down, although I was very tempted to go straight down the south face. Before the climb I told myself this would happen. You would summit and want a quick exit off the peak. However, there was too much risk for me to cross that berschrund solo. Only a tired mind can trick you into going against your plan. I stuck to my guns and made my way safely off the peak. Back at the bivy rock I finally allowed for a short celebration. I still felt as if I was in a dream. Was it the fact I had only gotten one hour of sleep? I'm unsure, but I felt so calm. Not necessarily overjoyed or overly emotional like in years past, but rather that all is well. Everything about this trip had gone perfectly. I came to realize in that moment that this was just an experience, like all experiences, and it was neither good nor bad, but rather just another chapter of this mysterious thing called life. I enjoyed every drop of it, allowing it to wash over me without trying to preserve or hold onto it. That is freedom - for at one minute to hold it so deeply in the palm of your hand and the next to throw it to the wind. I found a pool of cold glacial fed water near camp, so I stripped naked and submerged myself. The cold breathed new life into me. It was shockingly cold. I sat on a patch of grass and allowed the sun to dry my naked body. It was time to go. I packed up my belongings, shouldered my pack and began the walk out. It took four hours to reach the car and I enjoyed meeting people on my hike out, hearing about the different destinations people would visit in the valley. I couldn't help but stop every few minutes to turn and look back. There it stood, like a lighthouse on a wild coast. Towering, majestic, perfect. Mount Barth. Happy days...
- Mount Clarke
Date: October 28 - 29, 2023 Location: Forbes Mountains, Mount Aspiring National Park, Glenorchy, Otago, New Zealand Total Trip Distance: Bike - 15.31 mi / 24.63 km | Climb - 15 mi / 24 km Total Elevation Gain : Bike - 493 ft / 150 m | Climb - 6,300 ft / 1,920 m Trip Duration: 2 Days Team: Solo Field Notes: An absolutely brilliant trip up the Rees Valley with easy access via Clarke Slip. Biking up the valley on the 4wd track saves hours of walking, although beware of the river crossings after periods of heavy rain or high melt. There is a bivy rock just out of Clarke Slip at 1,300 meters with plenty of water but it will not provide adequate cover in rough weather. The ascent to the summit of Mount Clarke is straightforward with the south ridge as ones guide. Rating: 1, I Download GPX File Google Maps Location How does one describe the things that happen in the lofty places of the world? Truly, it is an impossible task. I've found my greatest pleasures in life to be in the high places. Yes, amazing women, delicious bread, and roasted meat is another story. But the hills are something totally beyond scope... "The non-climber will never understand it...but we who climb know what life really means...not till you have been to the edge of the abyss can you know how good life is and what a lovely place is the world." - Hermann Buhl The trip started with a bike up the stunning Rees valley. Massive snow capped peaks glistened above. I had about 14-15 km to get to Clarke slip and I could get most of them done by following the 4wd track that goes up the valley. At the first river crossing, I completely lost the 4wd track and spent the next two hours biking over untracked land (side note: I did find the correct track on the way back and the GPX file is correct!). After countless river crossings I came across the 4wd track for the final 15-minutes. At this point I stashed the bike in the woods and set off on foot. I walked through stunning beech forest and couldn't help myself from taking a ton of photos. Wire Bridge New Zealand is other-worldly. From biking through an open valley with towering peaks, crystal clear blue waters of glacial runoff, to a pristine forest filled with greens of every shade. I refreshed myself with a cold drink from the mountain spring and continued onward. Eventually I ended up at Slip Flat where I was to ascend up the southeastern slopes of Mount Clarke. This is obvious, and I think the best ascent / descent route goes up towards the end of the slip. I followed this straight up with easy travel through the forest for a few hundred meters until it turned into a rock field. Travel was significantly easier on the way up than down. Towards the top of the slip I met bluffs straight overhead. From here, the route angles up and to the climbers right still following the rock gully. I climbed onto the ridge, bashed through some scrub on my way upwards, and once passed the bluffs, went to the climbers left and gained the south facing slopes of Mount Clarke. As far as off-route travel goes, this was not bad at all. My next objective was finding the bivy rock. I knew there was one up here but I had no beta on it. With a perfect forecast and zero rain for the next few days, I didn't bring a shelter but brought my winter mountaineering bag (which I did not regret). As I traveled upwards I found it! It was a nice little cutout and perfectly flat. There is room for two people and I would not recommend staying here in rough weather. Rock Bivy on Mount Clarke For the next few hours I focused on hydration and refueling. As the sun dipped behind the mountains, I watched in awe as clouds danced around the summits of Mount Earnslaw. A truly stunning peak. As night fell, the moon replaced the job of the sun and cast its spotlight on the peaks. Every time I opened my eyes I said out loud "this isn't even real!" Mount Earnslaw was completely lit up by the moon and a few stars twinkled above. Magic. At 5 am I turned on the stove to brew some coffee. First light was at six and I wanted to be on the move at that time. I figured: three hours to the summit, thirty minutes of rest time, and an hour and a half down. Travel is straightforward to gain the snowfields. I followed the south facing slopes, always trending to be near the prominent ridge but never on it directly. At 1,500 - 1,600 meters it was time for crampons. After this brief transition I kept moving. Alpenglow made its appearance on the peaks above. Two hours of plodding along the sun finally broke above the south ridge - thank you. Mount Head and Moira Peak were absolutely stunning. From my perspective they looked virtually impossible to climb! I kept moving up the gentle slopes of Mount Clarke and traversed across the face and gained a col to the West. From here, I traveled up along the west facing ridge until I met the final few meters of the summit ridge. It was iced over and had a "knife edge" look to it. I drove my ice axe into the ridge and took the final steps to the top of the peak. What lay ahead of me was hard to take in. The views to the northeast had so many peaks of such incredible scale my head spun. The Snowdrift Range, the Peaks of the East Matukituki, and the Lord of the Bonar Glacier - Mount Aspiring - reached up towards the heavens. It seemed as if there were thousands of peaks in front of my eyes. The cold summit wind brought me back into the present and I backed off the summit and hid behind the ridge to refuel. I applied sunscreen, rehydrated and ate some trail mix. After snapping a dozen photos and videos I made my way off the peak. Getting back to the snow-free ridge was fast. It took me an hour to get back to the place where I had originally put my crampons on. Where the soft snow had slowed my approach up the peak, the soft snow made for very fast travel downwards. I couldn't help but keeping looking back at Mount Head and Moira Peak - wow. Surreal - Moira Peak & the Osonzac Twins Back at the bivy I packed up camp. I knew I still had a fair few hours of travel until I could get back to my car. The route back was pretty uneventful but I will make a quick note: make sure to go slow and choose the best route back to top of Clarke Slip. I rushed it and kept bashing my way through steep bush which was totally unnecessary. I also ate shit and took a hard fall while descending the top of the slip. At the bottom of the slip I gained the main trail and headed south back to my bike. Walking through the shaded forest one final time was a treat. It had been eight hours on the move so far and I was glad to be at the bike. As I peddled back to my car I was fired up to be on the 4wd track the entire time and I took care to not lose it when doing river crossings. Being on the correct track saved me about thirty minutes. At the final river crossing I stripped off all of my clothing and went for my ritual cold plunge. I sat on the warm stones completely naked and let the sun warm my body while I took in my final views of Mount Clarke. What a trip this had been. I love these types of adventures that require multiple disciplines: biking, river crossings, route navigation, bushwhacking, bivying, and mountaineering. This was my type of trip. This is why I am back in New Zealand. This is why I may never leave. Happy days...
- Mount Scott, Crown Peak
Date: June 3, 2024 Location: Crown Range, Arrow Junction, Otago, New Zealand Total Trip Distance: 9.30 mi / 15 km Total Elevation Gain : 2,961 ft / 903 m Trip Duration: 4 hr 52 min Team: Flora Yu Field Notes: If you have two cars, start from the top of the Crown Range and follow the obvious ridge to Crown Peak. Follow the 4wd track down to the other vehicle at Glencoe Road. Beautiful views of the Richardson Mountains. Rating: Hiking / trail Download GPX File Google Maps Location Mount Scott, Crown Peak Route Topo The other day I stopped into Small Planet to buy my backcountry ski set up for the season. The guy fitting my boots was an avid mountaineer. I asked him, "how have you found getting partners to go into the mountains with?" His response: "terrible." You'll notice on the overwhelming majority of my trips in New Zealand are solo. I've found it extremely difficult to make partners here. I think the majority of people who participate in mountaineering and backcountry skiing here is very, very small. However, one day I received an email from someone apart of the New Zealand Alpine Club, Flora Yu. I couldn't believe it. Flora is an aspiring climber and had also climbed Mount Liverpool. While we are in a transition season here in New Zealand, hiking still remains a fantastic proposition and an opportunity to continue to build fitness. Crown Peak We chose an easy objective for the day to stretch our legs and get some sun. Flora and I met at the bottom of the Crown Range at seven in the morning. The stars were still glittering at this point as we drove up the Crown Range. By eight we were climbing up the slopes of Mount Scott. There was a light breeze blowing but enough to know that it was indeed a cold wind. As we reached the the top of Mount Scott it was absolutely cold. The wind was coming right out of the south - from Antarctica. The highlight was that the sunrise hitting the golden tussock slopes of the ridge was a stunning sight. Following this beautiful ridge towards Crown Peak As we continued along the easy ridge our conversations slowly faded. This was not because we didn't want to speak to each other. It was because the wind picked up speed and it got bloody cold! At the summit of Crown Peak the views were stunning. We could see Major Peak, Minor Peak, Mount Larkins, Centaur Peaks, and Aspiring. We looked along the ridge towards Mount Sale and decided we were unmotivated to continue to get blasted by the wind, so we headed down. Thirty minutes later we were basking in the glory of a beautiful, sunny winters day. Near the bottom of the mountain we laid in the grass and enjoyed some snacks (mainly Flora's snacks). Although I love going solo, it was great to be in the mountains with someone else. Flora was great company with and I look forward to many more trips with her. For now we need snow! Happy days... Descending to the car from Crown Peak
- Mansion Hut & The Mount Bee Bunkrooms
Date: August 5 - 7, 2024 Location: Eyre Mountains, Taka Rā Haka Conservation Park, Southland, New Zealand Total Trip Distance: 15.04 mi / 24.2 km Total Elevation Gain : 2,957 ft / 901 m Trip Duration: 3 days Team: Alessia Bertan Field Notes: A super relaxing three day hut bagging trip in complete solitude. We walked in at sunset to Mansion Hut on day 1. The next morning we bush bashed up a spur to gain Mount Bee ridge and then headed to the Bunkrooms for an incredible day of relaxation. The next morning we walked back to the car feeling totally recharged. Rating: Hiking / tramping, off trail Download GPX File Google Maps Location Mansion Hut & The Mount Bee Bunkrooms Route Topo The Eyre Mountains from Mount Bee Ridge The Eyre Mountains have a bit of mystique about them. They are isolated, remote, and access can be tough. As one drives south past Kingston and enters the rural surroundings of Southland, the Eyre Mountains climb skyward from farm country. This was not the trip to go on a deep exploration, but rather to explore the foothills and bag a few huts along the way. Alessia is flying back to Italy at the end of August, so we decided to plan a road trip and explore some new areas before she leaves. With an awesome weather forecast in the South it was the perfect opportunity to explore new corners of the map. We arrived at the trailhead on Mulholland Road and set out with the sun making a rapid descent. Our plan was to walk a few short hours and spend the night at Mansion Hut - a two bunk bivy with an open fireplace. The walk up Irthing Stream was better than I thought with the track not being too hard to follow and only one stream crossing. There are many fantastic feelings in the mountains. Arriving to an empty hut after dark with headlamps beaming is one of them. I jumped straight in to getting the fire going with Alessia on emotional support. Mansion Hut is exactly what I thought huts would be like in the Eyre Mountains. Old, small, open fireplace, a bit of rubbish left on the floor, names scribbled on the bed posts, the door handle broken but somehow functional. In a word: character. Irthing Stream gurgled outside and the beech forest whispered in the wind. The stars that night burned so brightly I wondered if they were trying to communicate a deeper message. In the morning we woke to chirping birds and blue sky. What a perfect day to bush bash (Alessia's "first time"). Coffee was consumed and we started up the spur behind the hut towards Pt. 742. Although steep, this was the best part of the climb. After gaining Pt. 742 the long ridge up to Mount Bee ridge was slow and arduous. It felt like forever. Eventually we topped out, treated to fantastic views of the Eyre Mountains covered in a blanket of white with high-powered wind blasting the ridge tops. Alessia with Pt. 742 behind We had intentions to head north along the ridge but decided to head to the Mount Bee Bunkrooms instead. An amazing decision, because, we had the hut to ourselves and it was fully stocked with firewood. Thank you firewood God. We spent the rest of the day in a meditative state that would be difficult to put into words. Hot soup, crackling fire, warm hut, sun streaming through the windows, wind pounding the roof, minimal words spoken. The sunset put on a display that we felt we should've paid for and the stars had us wanting to leave behind a tip. It was one of the best days I've ever spent in a hut. That night we slept like pigs. The following morning we walked the 4wd track back down to the van, celebrating an incredibly relaxing trip with coconut water and a cold plunge in Irthing Stream. That afternoon we headed south towards Riverton in search of waves. Happy days...
- Rees River: 25 Mile Creek to Muddy Creek
Date: September 25, 2024 Location: Rees Valley, Otago, New Zealand Total Trip Distance: Paddling - 5.43 mi / 8.73 km | Hiking - 6.46 mi / 10.39 km Total Elevation Gain : 656 ft / 200 m Trip Duration: 4 hours Team: Chris Churcher Field Notes: A perfect first river trip, even after rain. Walk up the valley and depending on flow, put in at either Twenty Five Mile Creek or higher up the valley. Due to recent rainfall we were able to put in closer to the Hunter, although this is unlikely as the season goes on. Gauge flow for the Rees at Invincible : 25 cumec. We only scraped bottom a handful of times with no walking. Rating : Class I Download GPX File Google Maps Location Rees Valley Packrafting Route Topo. Chris walking alongside the Rees River Chris and I were brimming with excitement as we drove the Queenstown Glenorchy road on a stunning Wednesday morning. In my excitement I kept calling out the names of all the peaks we were driving past - namely the ones of the Richardson Mountains which I love so much. With all of the rain we were both curious as to how the Rees River would look. However, when we arrived at Muddy Creek it looked just as I remembered it almost a year ago when I climbed Mount Clarke. It was going to be a good day. We shouldered packs and marched North up the Rees. The last time I was here I took the 4wd track. This trip we opted for the actual trail. After having done both - the 4wd is faster and you’re going to get wet feet either way. If I was going on a non packrafting trip I’d just use my bike. As we walked up the valley there were three noticeable avalanches that had released in the last storm. Two on the east facing slopes of Mount Earnslaw and one on the east aspect of Ellie Peak. Unfortunately climbing season isn’t here just yet. It was hard to take our eyes off the dominant peaks of the valley, so I pitched Chris the idea of an ascent of Moira Peak and Mount Head this spring. “You’ll never be the same.” The sales pitch worked and he sounded stoked. As time ticked on our stoke was almost too much to handle. We had purchased these rafts months ago in the dead of winter knowing they weren’t going to be able to be put to use anytime soon. The only trip I had done was on Lake Manapouri - but it was flat water. This was an actual moving body of water (called a river). Our blood was boiling. Halfway between Twenty Five Mile Creek and the West Hunter we put in. We were borderline foaming at the mouth. This is the moment we had been waiting for. Paddling a pristine river surrounded by sandflies with the Forbes Mountain on our left and the Richardson Mountains on our right. I hope I never lose this level of stoke in the mountains. Whether it’s a grade 1 river, a grade 1 climb, a simple hike or a mellow backcountry ski run - it’s all about having fun. And today was beyond fun. We floated down the river, hit a few small wave trains, and smiled the entire way. It was awesome to see Chris totally absorbed and loving his decision to buy a packraft. Chris enjoy some grade 1 rapid fun. Mount Head and Moira Peak behind. When we took out just before Muddy Creek, the clouds came in and the wind picked up sending a cold chill through our bodies. We quickly packed up and headed back to Glenorchy so we could enjoy a celebratory coffee at the one and only - Mrs. Wooly’s. Happy days…
- Aparima Huts & South Braxton
Date: August 10-11, 2024 Location: Takitimu Mountains, Southland, New Zealand Total Trip Distance: 12.21 mi / 19.65 km Total Elevation Gain : 2,598 ft / 792 m Trip Duration: 2 days Team: Alessia Bertan Field Notes: Another relaxing trip, this time into the Takitimu Mountains. Park at Dunrobin Valley Road and walk the easy hour and a half trip to Aparima Huts. Take the 4wd track into Waterloo Burn and climb the northwesterly spur, avoiding scrub, to the summit. Permission must be sought from Waterloo Burn Station to climb South Braxton. Rating: Hiking to hut / basic tramping off trail for South Braxton Download GPX File Google Maps Location Aparima Huts & South Braxton Route Topo After our relaxing hut-bagging trip in the Eyre Mountains, Alessia and I spent a few days by the ocean in Riverton. The forecast was calling for weather to move in by Sunday night, so we decided to take advantage of one final spell of good weather and drive north to the Takitimus. The Takitimu Mountains are named after the ancient Maori migration waka (canoe) Takitimu. Neither Alessia or I had been here before and being mid-winter combined with the fact that we were seeking easier trips, we decided to hike in to Aparima Huts. When we pulled into the parking lot my intuition proved right - we would not be having this hut to ourselves like the previous trip. It was Saturday with a decent forecast. A party of three adults and two children shouldered large packs in the parking lot. That could mean one of two things. Either they were going deep into the bush (highly unlikely) or they were going to really enjoy themselves (likely). We weren't fussed either way and headed off to the huts with significantly smaller packs. Ninety minutes after leaving the car park we arrived at Aparima Huts. I was surprised to see the state of the main hut. The door was left open, flies buzzed inside, trash was on the floor, someone had left their shit covered toilet paper on the inside of the wood burner and the sleeping mats had traces of mold on them. It felt more like a basic bivy than a "standard hut." Climbing the NW spur of South Braxton Alessia and I had a bite to eat, ditched our gear, then headed up the Waterloo Burn 4wd track. Footwear came off as we crossed the Burn and soon enough we were heading up the northwesterly spur of South Braxton. I feared scrub but was happily proved wrong. Travel was easy up the spur and we were treated to a unique view of the Takitimus. As we climbed higher so did the speed of the wind. On the summit ridge we hid on the easterly side of the mountain and enjoyed a moment of relaxation. The wind was blowing about the tops and our minds drifted to a warm fire in the hut. I posed the question: "do you think we will have the hut to ourselves tonight?" Alessia said no and I optimistically said yes. Travel was quick down the spur and before long we were back at the 4wd track taking off boots and socks to cross the Burn. Wow that water was cold. At the crossing we watched as one truck tried to un-glue another from the mud. I didn't think there was a chance that truck was getting out. That mud was quicksand Indiana Jones deep. From L - R: Clare Peak, Waterloo Peak, Mount Hamilton & North Braxton from South Braxton I felt I had to ask the hunters... do you need our help? One of them laughed at my question as I sheepishly knew the answer before I asked it. When we arrived back at Aparima Huts we found them both fully occupied with fires roaring. The group from the parking lot decided to shack up with us while three teenage boys took the old one. I went over to the old hut to have a chat with the boys and hear about their trip. Aparima Huts They opened the door and with wide eyes and full hearts told me about their three day adventure. Crossing rivers, trudging through snow, hopping on slippery boulders, sleeping in weathered huts, howling at the moon. You could see, feel , just how impactful this trip was for them. The type of trip that leaves an imprint on the soul and is resistant to the elements. Like a passport stamp that leaves its ink behind for a lifetime. The folks we met in the hut were a kind bunch. They had brought plenty of wood, plenty of booze, and plenty of sugar for the youngsters. The adults were fascinated in Alessia's Italian roots and shared their positive experiences in her home country. As night fell, the kids tucked away and we adults scooted outside. A fire was started and the sparks climbed towards the stars. With the amount of time I spend in the backcountry, I am always surprised at how little I get to have a fire. This was a real treat. This trip was quite different to our time in the Eyre's but still an excellent time away in the hills. We had explored two mountain ranges that neither of us had ever been before. Back at the van, we enjoyed a delicious breakfast and a cold plunge in the Aparima River. That afternoon we headed north back to Queenstown to end a memorable one week road trip. Happy days...
- The Monument & Hope Arm Hut
Date: August 26 - 27, 2024 Location: Lake Manapouri, Fiordland National Park, Southland, New Zealand Total Trip Distance: Paddling - 7.65 mi / 12.31 km | Hiking - 10 mi / 16 km Total Elevation Gain : 2,390 ft / 728 m Trip Duration: 2 days Team: Solo Field Notes: A straightforward trip on Lake Manapouri, although I would be cautious to paddle it in anything other than light winds. The Monument makes a worthy side trip. There are excellent camp spots near Hope Arm Hut. Rating : Flat water paddling. Hiking. Download GPX Track Google Maps Location The Monument and Hope Arm Hut Route Topo I had been dreaming about packrafting for over a decade. The first time I ever saw someone using one was Alastair Humphreys - one of my favorite adventurers. Al is someone who has inspired me to pursue a life outdoors. It also helps that he's a genuine dude and a complete badass (although he wouldn't admit that). The Monument from the shores of Lake Manapouri Earlier this winter my friend Chris and I decided to do the Kepler Track over a nice weather window. We were stoked on the idea to do the walk without much people on the trail - probably our only chance really! On the trip the idea of using a packraft to explore Fiordland was brought up. I told Chris I had been dreaming of getting one for way too long and never pulled the trigger. Fast forward eight weeks and I got an email from Huw at Packrafting Queenstown letting me know that the rafts have officially arrived from the USA. A few days later I saw a break in the weather... calm winds and sunny skies for two days in Fiordland. I jumped in the van (I was already in my van) and drove south. I arrived at Frazers Beach to clearing weather. The cloud was lifting off the ranges and the lake was as still as an attic. I blew up the raft, swatted a few sandflies and pushed off into the lake. There was a moment of absolute silence. I was loaded up with two days of food while sitting in an inflatable raft. I actually laughed out loud I was that stoked. The snowy summit of Mount Moturau breaking above the clouds For the next hour and a half I paddled along the shores of Manapouri observing birds and the different variety of trees. It was so still. As I headed to the George Bay Portage the cloud was lifting off the snow covered Kepler Range. It felt like I was taking out my phone for a photo every two minutes. I found the classic New Zealand orange triangle trail marker on a tree, deflated my boat and loaded everything in my pack. I think it took seven minutes and I wasn't trying to go fast. A short fifteen minute walk through a swamped trail led me to the beautiful and sandfly infested George Bay. I quickly inflated my boat (much faster than the previous seven minutes) and paddled West into Rawin' Bay. Fiordland is not a real place. Towering snow capped peaks. Lush rain forest. Waterfalls that fall from the heavens. Spiritual bird calls. The lake was glass - which way was up or down? Around the corner stood the Monument at 466 meters tall. I pulled onto the shore and walked up the peak where I was treated to spectacular views of the Hunter and Kepler Mountains. By late afternoon I had disembarked from my vessel and arrived at Hope Arm Hut. Not a soul in sight. Unfortunately the hut was trashed and smelled like shit. Smashed beer bottles outside the hut, dirt all over the floor, trash left in the hut, used cigarettes left by the fire place. Disappointing. I spent two hours cleaning, wiping, sweeping, and chopping firewood. By sunset I had a fire roaring while steam lifted from my wet clothing. I looked out the window and was summoned to the lake to observe the remaining days light. I made my way to the edge of lake and exhaled deeply. The end of the day. Sunset complete. Last light. Twilight. The first star flickers above me through a wisp of cloud. Two birds call out into the unlit forest. Ripples of energy make their way across the water and dissipate at the pebbled shore beneath my feet. Deadwood is scattered across the beach. The shadows of the mountains creates a contrast which turns half of the lake jet black. Suddenly I feel everything, hear everything, see everything, am everything. As soon as I am conscious of this it's gone. Like a candle you are enjoying so immensely for the light it provides until, without warning, the wick burns out. Truly, all things pass. Twilight on the shores of Lake Manapouri. The Kepler Mountains in the distance with The Monumnent on the right. That night I had possibly the best sleep I've ever had in the mountains. I had parked myself next to the wood burning stove hearing only the crackling of dried wood and the distant bird call. In the morning I was greeted to light rain falling on the metal roof. Without delay I packed my gear and followed the trail into the bush, enjoying this section of the trip. I decided to climb over Point 477 and gain one final view of the mountains before returning back to my van. Along the way, my mind was brewing with so many new trip ideas and places to access. The packraft is an incredible adventure tool that opens the door to new ways to move in the mountains. Happy days...
- Rees River: Muddy Creek to McDougalls Creek
Date: October 1, 2024 Location: Rees Valley, Glenorchy, Otago, New Zealand Total Trip Distance: Paddling - 3.72 mi / 5.98 km | Walking - 4.2 mi / 6.75 km Total Elevation Gain : n/a Trip Duration: 2 laps with walking back to the start: 2.5 hours Team: Chris Churcher Field Notes: A super fun and bouncy Class II river trip. There is a Class III section that we opted not to paddle and so we started below the initial rapids. A car or bike can be left at the Invincible Mine Snowfields, or it is an easy forty minute walk back to the start. Gauge flow for the Rees at Invincible : 17 cumec. Rating : Class II Download GPX File Google Maps Location Rees River: Muddy Creek to McDougalls Creek Route Topo Chris walking to the put in Only one week ago Chris and I had broke our river packrafting virginity on the Class I section of the Rees River. It was a fantastic first trip and left us wanting more. With the weather still not cooperating to get high in the hills, we decided to go back back to the Rees and get some experience on the Class II section. It was almost a feeling of déjà vu as we drove the Queenstown Glenorchy road. We let out the same excited yell as we rounded the corner and got our view of the mighty Mount Earnslaw. That sight never gets old. Chris on the harder Grade II section As we inflated our rafts, there was a noticeable feeling of tension in my body. Although I knew that serious harm was unlikely to occur today, I had never paddled a Grade II rapid before. I spent a moment doing a quick visualization of the line I wanted to take down the river. The initial launch would be the most challenging part of the day. Straight into it. Five minutes later Chris and I were hooting and hollering - the adrenaline rush was unreal. I can see why people get addicted to whitewater and continue to crave the rush that comes with the higher grades. For now, we are stoked to paddle our Class I and II rivers in search of deep wilderness zones. Fun and bouncy sections on the lower end of the run Happy days.. Authors Note: There is a fantastic write up of this trip with detailed information from Huw Miles which can be viewed here.
- Waiau River
Date: October 10, 2024 Location: Fiordland National Park, Te Anau, Southland, New Zealand Total Trip Distance: Paddling - 14.56 mi / 23.43 km | Walking - 12.28 mi / 19.76 km Total Elevation Gain : 1,000 ft / 305 m Trip Duration: 2 days Team: Chris Churcher Field Notes: There are multiple starting points along the Waiau. The river starts with some Class II sections and after Rainbow Reach it becomes Class I. There are apparently jet boats along the river but we saw none. It is also important to note that there are some strainers and submerged logs. Excellent camping can be had on Lake Manapouri while hut options exist as well - Shallow Bay Hut or Maturau Hut (Great Walk Hut). We paddled the Waiau at 540 cumecs. Rating : Class I / II Download GPX File Google Maps Location Waiau River Packrafting Route Topo Chris nearing the end of the Waiau River. Stunning Fiordland scenary. Happy days..
- Mount Brewster
Date: October 17, 2024 Location: Main Divide Range, Ōhau Landsbrough, Mount Aspiring National Park, Otago, New Zealand Total Trip Distance: 12.19 mi / 19.61 km Total Elevation Gain: 7,152 ft / 2,180 meters Trip Duration: 15 hours 30 mins Team: Henry Frakes Field Notes: Brewster Hut had no available space so we opted for a single day push rather than carry bivy gear. The trickiest part of the approach is sidling the north facing slopes below Mount Armstrong. It pays to be diligent and pick the correct line. The South West face of Brewster is a consistent fifty degree face for roughly two hundred meters. The ridge to the true summit is exposed and often requires pitching. Rating: II, 2+ Download GPX File Google Maps Location Mount Brewster Route Topo Our line up the Southwest Face of Mount Brewster (photo credit: Neil Sloan @ https://neilsloan.smugmug.com/ ) The rise of a full moon in the mountains must be a good omen. Older generations, ones more connected to the natural world would have used the stars and moon to guide their path across landscapes and large bodies of water. As we sidled across the northwesterly slopes below Mount Armstrong, the moon made navigation easy and illuminated our path towards the dominant Mount Brewster. Twilight on Mount Brewster Just a few days ago I had successfully climbed and skied Fog Peak near Mount Aspiring. That trip had barely digested. As soon as I received cell service, friend and climbing partner Henry Frakes had already messaged me about a single day climb of Brewster on Thursday. “No” was not a realistic option. For one, I will jump at any opportunity to climb with Henry. Two, the weather had finally turned dreamlike. Three, I didn’t want to say “no” anyways! Mount Brewster stands at 2,516 meters and dominates the upper Makarora. The current snow coverage on the mountain is sensational due to a very snowy September. We brought our glacial kit but never used it. As we continued our side-hilling below Mount Armstrong, our ankles begged for mercy. With every crampon bite in the side facing slope, the ankle rolls to meet it while the boot stays stiff. Uninterrupted hours of that becomes ruthless. I wound up developing a hot spot on my left arch that turned into a nasty blister. There was no escaping the torture. Six hours in we stood at the base of the southwest face. It looked steep. The line is a consistent fifty degrees for two hundred meters and a fall would be very bad. Up until this point the snow had been incredible, but as soon as we worked up the face it turned to shit. The top layer was a deep sugary faceted layer that made it hard to get purchase. At other times, briefly, it was closer to ice. Henry topping out on the Southwest Face of Mount Brewster The climbing required a level of focus that I later described to Henry as “feeling like I was on a drug.” I could hear nothing except the beating of my heart and the attempt at controlled breathing through my nose. It wasn’t the conditions we were hoping for. Halfway up we briefly considered turning around. Just before exiting the face, the snow that met the ridge turned deep and soft. Henry was unsure and I took a moment to breathe, hoping he would punch through. Eventually he said, “so…you want to come take a look?” It still makes me laugh when I think of how he said it. I moved up next to Henry and was confident we could top out. Every foot placement, every crampon placement, I made one hundred percent. It worked and at seven thirty in the morning we met the sun and stood successfully on top of the southwest face. Alpine Glory. The summit ridge of Mount Brewster. We cramponed up the summit ridge and were greeted with spectacular views. Wild and raw summits radiated out at all angles. A mountain of similar difficulty lay to the east - Mount Barth of the Ahuriri Valley. What was not spectacular was the final climb to the true summit. We stood on the smaller of the two high points, just a few meters in height but thirty meters in length separating us. We had the rope and necessary technical equipment, but the snow quality was terrible. At times, the snow would completely give way underneath your feet. On the face it was distressing. On the summit ridge, it could be fatal. Even with gear the consequences of a fall would be disastrous. There is a time when to hold ‘em, and a time when to fold ‘em. There wasn’t much debate and we headed down. We had successfully climbed the southwest face, our goal, and a few meters in height was not worth the risk. The entry back onto the face was precarious and I took extra care to make it easier for the both us to get back onto the side of the mountain. Down climbing the two hundred meters was arduous work. I was constantly getting showered by snow and ice as Henry moved above me. I kept my head down and move deliberately. I breathed a huge sigh of relief when I exited the face. As I sat and waited for Henry, a sort of trance fell over me. Everything was dead quiet and all of my senses were heightened. I stared at the hundreds of peaks before my eyes, my mind totally empty. As my nervous system relaxed, I became extremely hungry and ate half of my food. The long walk back to Brewster. Henry soon joined and we had a good laugh together at the poor conditions, but stoked on the outcome. We packed up and worked back to the hut. The sidling across the mountain was one of the most painful experiences I can recall in a long time. Our feet were smashed, battered, and blistered. Henry resorted to side-crab-walking-kind-of-thing. It was brutal stuff. Back at the hut we took an hour to recover. We ate food, re-hydrated, and chatted to a few hikers. Eventually, it was time to descend and it took much longer to go down than it did to go up. Thankfully Henry and I always laugh together and it made the descent a bit easier. Fifteen and a half hours later we were back at the car park swatting away sandflies and bathing in the Haast River. All I can say is: it was a trip to remember. Happy days... Our line up the Southwest Face of Mount Brewster
- Clare Peak
Date: November 3, 2024 Location: Takitimu Mountains, Southland, New Zealand Total Trip Distance: 10.53 mi / 16.94 km Total Elevation Gain : 5,233 ft / 1,595 m Trip Duration: 7 hours 37 min Team: Solo Field Notes: Climb to Princhester saddle and find a rough climbers trail behind a fallen log. Navigate through bush, doing your best to follow the rough trail that breaks above the bush line at 1,000 meters. Head straight uphill to Point 1221. From here, take the obvious ridge up and over Point 1424 then on to the summit of Clare Peak. There is good camping in the basins below Clare Peak. Rating: Tramping, off trail Download GPX File Google Maps Location Clare Peak Route Topo It is ten thirty by the time I start the day. It is amazing how fast the seasons change. Now there is so much light. I thought time would slow down when I took a long sabbatical from work. It hasn’t. It’s a beautiful spring day. The sun is shining and the sand flies are hiding. Young lambs follow their mothers through the Southland pastures and flowers burst into bloom. Lower Princhester Hut I take the rugged trail north towards Princhester Saddle. A never ending process of up and down, roots and rocks, and other obstacles keeps travel slow. These types of tracks always cause internal friction because the climber wants to move fluidly but the terrain says otherwise. So there is a feeling of force rather than flow. At Princhester Saddle I head West following somewhat of a trail. In a section of thick ferns I lose it and curse out loud repeatedly as I smash through snow covered bush. The wind is up, earlier than forecasted, and it is blowing like it is trying to prove a point. It is a cold spring day and my lower body is soaked from the snow covered forest. Above bush line I immediately thrown on mittens and a down jacket. I am very cold and I eat on the move. Thinking I am through the worst, I am proven wrong. Steep scree slopes for three hundred meters lead up to the ridge. On the tops now, the wind doesn’t allow me to think and I keep moving. I can see the summit of Clare Peak and it looks painfully far away. The last time I was in the Takitimus was much more relaxing. Some days in the hills are romantic. Today, the Takitimus seem bleak and uninspiring. Multiple times I consider turning around. I follow the ridge, post holing at times or navigating icy rocks. At Point 1424 I take out my ice axe. Down climbing ice covered rock is not on the menu today so I decide to bypass them. I drop down five meters and climb across the side of the mountain, stabbing my ice axe into the tussock while kicking steps into the snow. A slip here would be very bad. Safely across I am on my way now and I smile for the first time since leaving the car. It is a strangely quiet scene. The wind comes in blasts and then goes silent. There are no birds, no wildlife. There is no one around. The surrounding mountains look wind battered. Four hours since leaving the car I stand on the summit and sit down. Besides putting on my jacket, it’s the first break I’ve taken the whole day. I look out across the mountain and feel nothing. The entire day has felt like force instead of flow, frustration instead of fun. And it is supposed to be fun - otherwise, what are you doing? This is what I love about the mountains. They are the ultimate teacher, the ultimate master of truth. It will show you exactly where you are at, among many other things. Happy days... Looking back to Point 1424 (R) and Point 1221 (L) from the East Ridge of Clare Peak
- Pt. 1668, Hector Mountains
Date: August 2-3, 2024 Location: Tapuae-o-Uenuku / Hector Mountains, Lake Wakatipu, Otago, New Zealand Total Trip Distance: 13 mi / 20.92 km Total Elevation Gain : 5,000 ft / 1,524 m Trip Duration: 2 days Team: Solo Field Notes: Park at the pullout just past Devil's Staircase Creek and follow 4wd tracks that lead up the mountain. There are nice camp spots on the ridge, although likely bare of water without snow to melt. Rating: Hiking / Tramping Download GPX File Google Maps Location Pt. 1668 Hector Mountains Route Topo With winter in full swing and a fresh drop of new snow, I wanted to test out my new Jetboil MicroMo and see how good it was at melting snow. I was keen to sleep in my tent as well. With so many multi-day trips in New Zealand involving a hut for the nights accommodation, I feel like I don't really get to use my tent that much. If I'm camping and snow isn't involved, I'll almost always look for a bivy rock or bring one of my all-time favorite pieces of gear: The MLD Trailstar. I purchased this tarp tent 14 years ago and it will be a piece of gear that will last a lifetime . Maybe I'll write more on this piece of gear later. Climbing above Devil's Staircase Creek. I arrived at Devil's Staircase Creek under a bright blue sky. There was not a breath of wind. My pack was strapped to my back and I set off up the 4wd track. To find the track, cross the bridge just next to the parking lot (heading towards Kingston) where there is a locked fence. Hop the fence and follow a rough 4wd track up in a northerly direction before it crosses farmland and becomes more defined. Note: I am always wary of trespassing on a farmer's land. This route is described in the new Moir's Guide. Think for yourself and take responsibility for your own actions. The walk up was largely uneventful. A few sheep not keen to get to know each other, the smell of farm country, the buzzing of helicopters. It felt like spring. I wore shorts and a t-shirt and admired the breathless bluebird sky. Sunset came rather quickly and I decided to set up camp at Pt. 1469. I dug out a platform for my tent and set up camp. I got right to work melting snow and was super impressed with the MicroMo's efficiency. As we enter climbing season where speed and efficiency is of the utmost importance, there is nothing worse than a stove not up to the task of melting snow. Money well spent. The sunset was phenomenal and it was absolutely cold. Not a breath of wind and the stars hyper charged. I wondered if I should howl into the night like a wild animal. We are animals after-all. I went against this impulse, too scared to disturb the night. When I say it was quiet, it was like being in a sensory deprivation tank. The type of quiet that sends a chill up the spine. Sunset over the Hector Mountains I spent that night in a hypnotic mountain trance. Melting snow, drinking hot soup, eating chocolate - but not too loudly! All on repeat until I curled into my warm sleeping bag and slept like a hog. In the morning I quickly warmed some water, strapped on boots and climbed higher up the ridge. I had intentions to climb James Peak but was extremely unmotivated after post holing, sometimes up to my waist, to reach Pt. 1668. Should've brought skis. The sun was already baking me like a chicken left too long in the oven. Already content with the trip, I headed back down to the tent for some coffee and a nap. Late morning, relaxed as I was, I decided to pack up and head back down to the van. It was great to spend a more relaxing trip up high without the backbreaking work of a big climb. Happy days...
- Remarkables Grand Traverse
Date: July 15, 2024 Location: The Remarkables, Queenstown, Otago, New Zealand Total Trip Distance: 7.56 mi / 12.16 km Total Elevation Gain: 2,750 ft / 838 m Trip Duration: 10 hr 36 min Team: Henry Frakes Field Notes: The Grand Traverse is considered "one of the finest alpine days in the country" and it lived up to expectations. We encountered challenging conditions and used the rope to pitch the crux sections of Double Cone until we finally stood on the summit. For the climb we carried a 60 meter rope, a set of cams and nuts. Rating: II, 2+ Download GPX File Google Maps Location Remarkables Grand Traverse Route Topo As winter dragged on in the Southern Alps without much snow to work with, Henry and I tossed around a few ideas. I still hadn’t done the Grand Traverse and was very keen to do so. Henry had done it a few times already so I was pumped when he said yes to the idea. It was a brutally cold morning. I was up at 4 am, brewing coffee, peering out at the stars from my van and preparing for the climb. We met at the base of Remarks and drove up a quarter of the way when Henry said, “oh shit, I forgot my helmet.” Figuring he might need that we turned around. We started the climb at 8am and post holed up to the helipad. The snow was pretty terrible and it was hard not to be negative to see a ski field with so little snow. I am very happy I decided not to buy a season pass. From the helipad the actual climbing began. The temperature decided to turn from very cold to very nice. The sun was out and the sky a blue-ish hue. We traversed slightly below the ridge for awhile and then busted out the rope. The climbing was easy, however, sections of easy scrambling were now covered by small amounts of snow on rock. Henry, being the stronger climber, lead the crux sections. The climbing was fun and the scenery spectacular. We were just two small figures moving alone on an alpine ridge. As the hours passed by, clouds formed and wind rose as we neared the north summit of Double Cone. On top, we rapped down to the col between the Double Cone summits. Here came the crux. From the guidebook description, the route seems to sidle the ridge. With the snow cover, that wasn’t an option so we climbed directly up the ridge. I was surprised at some of the moves and how sustained the climbing was. When I got up to Henry at the top of the pitch, I questioned whether this was actually a “2+.” He felt like it was probably harder given it was winter and how poor the snow conditions were. Grand Traverse Glory It was getting late in the day and the wind had decided to blow - I was cold. We hadn’t done a proper job with hydration and eating. It was one of those keep moving type of days. At the top of the southern summit of Double Cone we looked across at the traverse to Single Cone. I was stoked to actually use my ice axe. The ridge looked airy and fun. The sun was making its colorful descent as we popped up to the top of Single Cone. We snapped a few photos and began the series of rappels off the peak. Like many epic days in the hills, we arrived back at the car with headlamps on. The whole climb had taken us a few ticks over ten and a half hours. Unfortunately, I left my ice axe somewhere after the rappels off Single Cone (if anyone finds it let me know), but it didn’t dampen my mood in the slightest. The Grand Traverse was something I had wanted to do for quite awhile, especially in winter, and it did not disappoint in the slightest. Happy days...
- Kepler Track
Date: July 3 - 5, 2024 Location: Kepler Mountains, Te Anau, Fiordland National Park, Southland, New Zealand Total Trip Distance: 34.21 mi / 55 km Total Elevation Gain : 6,607 ft / 2,014 m Trip Duration: 3 days Team: Chris Churcher Field Notes: There is much written already about the Kepler Track as it is one of the most popular walks in New Zealand. Chris and I decided to jump at the opportunity of walking the track in winter with a perfect weather forecast. For three days we enjoyed solitude, empty huts, an inversion layer, and cold, calm weather. A great experience for my first ever trip in Fiordland. Rating: Hiking Download GPX File Google Maps Location Kepler Track Route Topo Takitimu Mountains from Mount Luxmore The Kepler Mountains from Mount Luxmore Happy days...
- Middle Peak
Date: June 26 - 27, 2024 Location: Motatapu / Soho Station, Crown Range, Wanaka, Otago, New Zealand Total Trip Distance: 17.77 mi / 28.59 km Total Elevation Gain : 6,956 ft / 2120 m Trip Duration: 2 days Team: Solo Field Notes: Fern Burn makes for a pleasant overnight destination on this route, otherwise it's a big day. To climb Middle Peak, take the obvious leading ridge directly behind the hut and follow it south towards Pt 1792. Head east over Pt 1810 and summit Middle Peak. Continue along the ridge over Pt 1752 and ending at Pt 1650. Take the ridge down to the stream, eventually climbing in a northerly direction out of the stream to avoid scrub. Drop back to the stream at any convenient location, fight some scrub and end at the hut. Rating: Hiking / tramping, off trail Download GPX File Google Maps Location Happy days...
- Ben More
Date: June 8, 2024 Location: Twenty Five Mile Range, Whakaari Conservation Area, Queenstown, Otago, New Zealand Total Trip Distance: 12 mi / 19.3 km Total Elevation Gain : 5,750 ft / 1,750 m Trip Duration: 8 hours Team: Solo Field Notes: An excellent route to a remote peak in the Queenstown area without a soul in sight. Follow the 4wd track until crossing Moke Creek and veering left to climb the obvious scrub free spur. Unbeknownst to myself, this route is called "Moke Spur" and is marked by a few orange poles. The route ends at roughly 820 meters. Continue up the obvious ridge until it tops out near Point 1495. Head north to Point 1599 until dropping into a basin where there is fresh water. Climb up and sidle northwest past Point 1799 to gain the summit ridge. Rating: Hiking / tramping, off trail Download GPX File Google Maps Location Ben More Route Topo I had my eye on Ben More ever since I climbed Mount Hanley a few months back. That day was relatively uninspiring, but Ben More really caught my eye. A theme one would notice with this blog is that I enjoy climbing mountains that seem obscure or out of the way. From my research, I couldn't find any information about Ben More which made it all the more appealing. With a perfect weather forecast I headed out to Moke Lake. Although there isn't much snow at the moment, it sure feels like winter. The temperatures briefly touched freezing overnight and I was glad to have paid an electrician to install a diesel heater in the van. There was a blanket of low cloud at camp and it looked to be a day above the clouds. A frosty morning along the Moonlight Track Around eight in the morning I left the campground and followed the 4wd track up Moke Creek. After trying to unsuccessfully hop across the creek I soaked my boots and socks and somehow found the courage to soldier on. Jokes aside, it is depressing to get your feet completely wet in the first fifteen minutes. As I climbed the spur I noticed something orange sticking out of the ground - a pole! I looked uphill and spotted another one. This caught me by surprise because I didn't think there was any route up here. I followed the poles upward in the same way that I had planned the route. Abruptly, the route ended at 820 meters. I continued on, following the obvious ridge to Point 1495. Near PT 1599, Ben More is just visible behind PT 1799 which is covered in ice At the top of the ridge I had my first view of Ben More. My heart sank a bit. I left the spikes in the car not thinking I would need them. Mainly, I didn't want to carry the extra weight. As I looked towards the peak, there seemed to be some snow and potentially icy sections. There was only one way to find out. I followed the broad ridge and soaked in the perfect views of the Twenty Five Mile Range. The morning was absolutely perfect. Blue skies, no wind, and totally above the clouds. The scenery was brilliant. Once I reached Point 1599 I still wasn't optimistic. I couldn't tell if there was ice build up along the slopes toward the peak. It's so funny how the mind wants the easy option and to pack it in. No chance and laughed at the thought. From my vantage point, the easiest option to gain the summit ridge was to drop into the basin below, climb out, and sidle past Point 1799. This would add another three hundred odd meters to my day, which I looked at as extra training for the bigger days. I dropped into the basin below, drank some fresh mountain water, and headed upwards. This was a day I could've gone for hours and hours. I thanked my body for continuing to stick with me all of these years. It still blows me away just how far I've come from being virtually disabled for so many years and how much more room I have for growth. Once out of the basin I realized that conditions were totally fine. In hindsight, I still should've had a pair of light spikes, but I was relieved that this was going to turn into a new summit. It's always funny how the perspective from which one views terrain is so critically important. At certain angles, the mountain looks casual. From other vantage points, it looks impossible to climb! To this point, I remember back in November when I climbed Mount Barth. From the bivy rocks, I thought the face looked pretty casual. When I got there, I measured what I thought was the steepest part of the face. It turned out to be fifty degrees! Pretty steep without a rope. Gaining the summit ridge of a mountain in perfect weather above the clouds is a feeling that will never, ever get old. The Richardson Mountains exploded skyward while the East Peak of Mount Earnslaw poked out in the distance. The view from the summit was spectacular. Without a breath of wind, I basked in the glory atop the perfect peak. From left to right: Major Peak, Stone Peak, Mount Larkins, Mount Butement To the east lay Bowen Peak and Ben Lomond, which on a day like today, most likely saw at least one hundred trampers. Who can blame them? To the north lay the chain of the Richardson Mountains, one of my favorite mountain ranges. Minor Peak, Major Peak, Stone Peak, Larkins, and Butement. In the far back, Centaur Peaks. I love tramping as much as I love backcountry skiing and as much as I love mountaineering. Each of these buckets provides there own sense of adventure and a different way to explore the mountains. Climbing Ben More, although not a major mission by any means, is just as fulfilling as the bigger, more committing climbs. Craigellachie center image Forty five minutes later I decided it was time to head down. I retraced my steps, smashed down the spur, and arrived back at the van to a very cold late afternoon. The day ended with a hot shower back in Queenstown. Happy days...
- Grandview Mountain
Date: May 30, 2024 Location: Lake Hāwea, Grandview Mountain Range, Otago, New Zealand Total Trip Distance: 11.17 mi / 18 km Total Elevation Gain : 3,349 ft / 1,021 m Trip Duration: 4 hr 51 min Team: Solo Field Notes: A beautiful walk in a quieter park of the Wanaka Region. Amazing views over Aspiring and the Grandview Range. Rating: Hiking / trail Download GPX File Google Maps Location Grandview Mountain Route Topo Happy days...
- Isthmus Peak
Date: May 27, 2024 Location: Lake Hāwea, Matatiaho Conservation Area, Otago, New Zealand Total Trip Distance: 10.23 mi / 16.5 km Total Elevation Gain : 4,012 ft / 1,222 m Trip Duration: 5 hours Team: Solo Field Notes: A poled route from the parking lot leads to a simple 4wd track up the mountain. Incredible views over Aspiring, the Makarora, and Hāwea Conservation Park. Expect to see a lot of people. Rating: Hiking / trail Download GPX File Google Maps Location Isthmus Peak Route Topo Happy days...
- Minor Peak
Date: April 29, 2024 Location: Richardson Mountains, Glenorchy, Otago, New Zealand Total Trip Distance: 7.19 mi / 11.57 km Total Elevation Gain : 4,784 ft / 1,458 m Trip Duration: 5 hours Team: Solo Field Notes: An excellent walk with fantastic access directly off the Glenorchy Queenstown road. You can see the summit from the parking lot. Park at Lake Face Creek Falls trailhead, walk across the street, and head straight uphill doing your best to avoid the scrub between 700 and 950 meters. Take the northwest ridge to the summit. Rating: 1, I Download GPX File Google Maps Location Minor Peak Route Topo Minor Peak Route from the road With the new snow beginning to fall and winter approaching, I sought out a trip where I could still get up relatively high. Minor Peak seemed like a quick trip in comparison to others and it would also give me the opportunity to scout out the route for Stone Peak. I parked at Lake Face Creek trailhead and stared up the at the 1,768 meter summit which can be viewed directly from the road. It was a perfect autumn day. There was not a cloud in the sky and as I began climbing up the ridge I realized I wasn't wearing my sunglasses. Rather than walk three minutes back to the car I continued uphill. A few frightened sheep later and I hit the scrub at roughly 800 meters. This is totally avoidable by sidling south, however, there are ankle high thorn bushes to deal with and it's better to just pick a route through the scrub. Once through this short section of bush, travel is fast. I gained the summit ridge in just over two hours and the views of Stone Peak, Mount Larkins, and Major Peak are sensational. Stone Peak, Sentinel, Larkins As I looked up at Major Peak I asked myself a very sincere question: is this skied from the summit? From my initial research I haven't found any information online (which is typical of New Zealand mountains). But I've climbed that face before and think it could make for a fantastic ski mountaineering mission. As I reached the final steps to the summit of Minor Peak I couldn't help but feel a pulse of excitement through my veins for the upcoming winter season. There is so much to do here in New Zealand we are beyond blessed. This will be my first ski mountaineering season here and am looking forward to exploring the mountains with planks attached to my feet. Happy days...
- Solomon's Throne, The Temple
Date: April 5, 2024 Location: Walls of Jerusalem National Park, Tasmania, Australia Total Trip Distance: 13.37 mi / 21.51 km Total Elevation Gain : 3,673 ft / 1,119 m Trip Duration: 6 hours 55 min Team: Solo Field Notes: A nice walk through beautiful country. Most of the elevation is gained on the approach and the peaks hardly require any climbing. There are nice campsites in this area. Rating: Hiking, trail Download GPX File Google Maps Location Solomon's Throne & The Temple Route Topo Happy days...
- Mount Roland
Date: April 9, 2024 Location: Mount Roland Regional Reserve, Sheffield, Tasmania, Australia Total Trip Distance: 10.84 mi / 17.45 km Total Elevation Gain : 3,201 ft / 975 m Trip Duration: 5 hours 30 min Team: Solo Field Notes: Mount Roland is a fantastic walk through stunning Tasmanian forest and a 360 degree summit with views of mountains and the ocean. Rating: Hiking, trail Download GPX File Google Maps Location Mount Roland Route Topo Happy days...
- Mount Hanley
Date: March 13, 2024 Location: Twenty Five Mile Range, Queenstown, Otago, New Zealand Total Trip Distance: 9.59 mi / 15.43 km Total Elevation Gain : 4,512 ft / 1,375 m Trip Duration: 6 hours 15 min Team: Solo Field Notes: Take the track around Moke Lake until one reaches the southern end of the lake. Find a sheeps trail that climbs directly up a spur to reach the top of Williamsons Spur at roughly 1300 meters. From here, follow the spur until it joins the east ridge of Mount Hanley. Climb up and over Point 1572 and scramble up to the summit of Mount Hanley. There is some moderate exposure to reach the summit. Moke Lake Campsite is an incredible place to spend a night. Rating: Hiking / tramping, off trail Download GPX File Google Maps Location Mount Hanley Route Topo Happy days...
- Sentinel Peak
Date: February 16, 2024 Location: Hāwea Conservation Park, Otago, New Zealand Total Trip Distance: 10.4 mi / 16.7 km Total Elevation Gain : 5,673 ft / 1,729 m Trip Duration: 7 hours 37 min Team: Natalya Lucas Field Notes: Take the sawyer burn track until about 900 meters in elevation where a beautiful route up the south ridge leads to a basin directly below the summit of Sentinel Peak. A cairned scree gully gives easy access to the summit ridge. There is no water en route. Rating: Hiking / tramping, off trail Download GPX File Google Maps Location Sentinel Peak Route Topo Map For the last few weeks I've been fortunate to spend time with a beautiful person I met in Wanaka after climbing in the Barrier Range. Since that moment, I've quit my job and moved into a van to pursue my thirst for adventure and take a significant amount of time away from work. Natalya and I planned a 3-day trip to test out of the van and I decided we should head up Sentinel Peak, just across the street from our campsite. Sentinel stands like a guardian over Lake Wanaka and Hāwea. Early morning at Lake Hāwea above Kidds Bush We woke up to a beautiful sunrise, made coffee, did some yoga, and headed up the mountain. I was surprised to see Natalya getting off to a hot start as I told her we had a good 1,700 meter climb ahead of us. On the other hand, she is fit and I was carrying all of the gear so maybe I needed to pick up the slack! We climbed higher and higher and the views were simply stunning. We left the trail and began to head up the south ridge of Sentinel. At this point Natalya was feeling the grind of the relentless climb but she soldiered on. We moved along the ridge with the views becoming more expansive at every moment. At last we reached the basin below the summit. It was pretty obvious which gully to climb up and at the top we got our first views to the North. The views were absolutely sensational. The northern ranges of Hāwea are not the tallest, but they are beautiful and spark the desire to explore these lesser visited peaks. A short walk along the ridge and we stood atop the peak. I was super proud of Natalya as it was the biggest climb she has ever done. Not to mention, it only took us three and a half hours to reach the summit. It was a special moment to share a summit with someone I cared about in the romantic sense. That was a first for me. We relaxed on the summit for an hour enjoying the views and solitude. Eventually it was time to leave as we did have a two hour drive back to Queenstown. The walk down hammered us both and we were frothing to jump in cold Lake Hāwea. At the bottom our minds were finally at ease in the cold water. Natalya came up with the brilliant idea of pizza so we headed to Wanaka to fulfill that vision. This trip was one of my favorites of the year - stunning views, excellent company, and a beautiful route. Happy days...
- Ben Lomond & Bowen Peak
Date: February 4, 2024 Location: Richardson Mountains, Queenstown, Otago, New Zealand Total Trip Distance: 11.55 mi / 18.59 km Total Elevation Gain : 5,900 ft / 1,798 meters Trip Duration: 5 hours 57 min Team: Solo Field Notes: Although this is not a place to go if one is looking for solitude, the views are spectacular. Bowen Peak offers a chance to escape some of the crowds with an easy walk from Ben Lomond Saddle. I did, however, share the summit with a helicopter dropping off some bikers! Rating: Hiking, trail Download GPX File Google Maps Location Ben Lomond and Bowen Peak Route Topo Happy days...
- Johansen Peak, Barrier Range
Date: January 1 - 4, 2024 Location: Barrier Range, Mount Aspiring National Park, Otago, New Zealand Total Trip Distance: 35.52 mi / 57.16 km Total Elevation Gain : 9,240 ft / 2,816 m Trip Duration: 4 days Team: Solo Field Notes: The Barrier Range is one of the most stunning ranges I have ever laid eyes on. Two days of travel is typically required to reach the alpine with very strong navigation skills. The crux of the trip is route finding once across the wire bridge at Daley's Flat. There is a natural rock bridge 80 meters above the Dart that allows easy travel across the Margaret Burn (location on map). Finding this rock bridge is critical. From here, a 500 meter bushwhack gives way to an open ridge line. Tarns and spectacular camp spots are at 1,540 meters. To summit Johansen, climb the SW face and then sidle east to bypass the summit ridge to avoid false summits. Scramble up exposed rock on the SE ridge to reach the true summit. Rating: II, 1+ Download GPX File Google Maps Location Johansen Peak, Barrier Range Route Topo. The pin indicates the location of the rock bridge. Just two days after climbing Mount Aurum I found myself heading up the Dart Valley. The weather forecast was giving me three very solid days of high pressure and I knew that this was realistically my only chance to visit the Barrier Range over the next year. Sometimes when opportunity strikes you find yourself surprised by how quickly it comes. This is the beauty of riding the wave of life. The Dart Valley is a huge contrast to the Rees side. The Dart River is massive, fed by the huge glaciers of the Whitbourn, Hesse, and Dart. The Rees River you can drive, bike, or walk through. When I went to climb Mount Clarke I loved biking up the wide open valley. In contrast, as I made my way up the Dart it was a series of ups and downs, spending much time in the forests. Looking into the Beans Burn It was about 17.5 km's to reach my first destination of the trip, Daley's Flat Hut. My pack was the heaviest it had been in a very long time. Two ice axes, crampons, helmet, mountaineering boots, shelter, and four days of food. There was no way to go lightweight on this one. I broke up the approach into a series of one to one and a half hour stops so that I didn't burn myself out as days two and three would be much bigger. After five hours on the dot I arrived at Daley's Flat Hut and was surprised to only see a few folks there, being New Years on the popular Rees-Dart track. The people that were there, however, were a real treat to be around. For most trips I do, I almost always have the hut to myself and I love the solitude. But it was great to share a hut with some new folks. One person I really enjoyed speaking to was Ryan from Florida. We both shared a passion for maps, adventures, health, and life. It was a pleasure to meet him. I had a leisurely morning before I began the climb to reach the Barrier Range. I figured it would be another five hour day and saw no point rushing out. I shared a nice morning with Ryan and his wife, excited to hear about their additional travel plans in New Zealand. They made their way out of the hut around ten and I followed soon after, butterflies in my stomach. Ryan and his wife leaving Daleys Flat Hut To be honest, the scariest part of the trip was crossing the wire bridge above the Dart! God bless the people who put that in. As soon as I crossed the wire bridge there is nothing but forest. I had spent months of research on this route and it was time to make it happen. I headed in a northerly direction and looked for a deer trail that would lead me to the natural rock bridge. A bushwhack through stunning beech forest I didn't find much of a deer trail but made my way through the bush for about thirty minutes and landed directly on the rock bridge. Stoked! I will make a note here: finding this rock bridge is critical as I'm not sure how one would be able to get across the Margaret Burn without it. Feeling more confident, I found a very solid deer trail that took me directly up through the forest for about three hundred meters. This was not bad at all! Then reality struck as it always does in the hills. The deer trail ended and I met some pretty heinous scrub and terrain. I'm not sure how to describe this, but there were huge holes and chasms in the mountain side that would lead to dead ends. My parents would be so disappointed to hear the words that were coming out of my mouth! Finally, I broke out of the scrub and reached tussock slopes at the 1,100 meter mark. I continued to make my way upwards, feeling drained and dehydrated. The terrain was much easier now and I was waiting for my first view of the Barrier Range that I have dreamed about for so long. Tussock gave way to rock and at 1500 meters I was in another planet. What lay in front of me was arguably the most spectacular group of mountains I have ever laid eyes on. The peaks of the Barrier Range combined with the gnarly Margaret Glacier looked formidable. Two days of hard work and I felt very much rewarded. The mighty Barrier Range. Albert Peak, Gino, Watkins, Steffanson and Desperation Pass I set up a camp out of the wind and took a spectacular swim in the nearby alpine tarn. This was a campsite of dreams. I hung out in my sleeping bag, drinking tea and admiring the view when I heard voices in the distance. No way I thought... people? Sure enough, three women came bounding up over the ridge and right into camp. I was barefoot just laying in my sleeping bag and they literally thought I came up here like that as my tent was out of sight! Hilarious. That night I went to bed early as my plan was to be up for sunrise. My alarm rang at five and I quickly gathered my things, made a coffee, and set out for the climb. The morning was of the Gods. Perfection. Calm. Alpenglow baked the peaks. I'll allow the photos to speak for themselves. My goal was to climb Johansen first, than head down to Seal Col, then bag Stefansson and Watkins. I gained the snowfields below Johansen and worked my up the southwest face. The snow was perfect and the morning stunning. I was pinching myself. At the top of the southwest face I followed the broad ridge up to the summit plateau. From here it seemed an easy walk to the summit. A few final steps and I shouted out in excitement as I thought I reached the top, however, when I reached the peak I realized it was a false summit! I looked further along the ridge and there was a point that was definitely higher, with some very exposed climbing to reach it. SW Face of Johansen Peak, steeper than it looks but an easy climb nonetheless In that very moment I thought about just accepting where I was but something inside of me urged to keep exploring. I down climbed the ridge and then sidled along to the east. I had a look at the true summit and the climbing seemed exposed, again my mind convinced me this was good enough . I knew I would regret this if I did not keep pushing, there was absolutely no reason to turn around. I sidled under the summit and began to climb the southeast ridge. Scree gave way to steep ledges but the rock was surprisingly very solid and enjoyable to climb. Once above the ledges, I gained a narrow and exposed ridge that took me directly to the summit. From here I let out of a shout of joy - I couldn't believe it. I had dreamed of climbing in the Barrier Range ever since I came across photos of this place so many years ago. Here I was, in perfect weather, in complete solitude, on a lofty summit. Dreams are the seedlings of reality. - Napoleon Hill After hanging out on the summit for thirty minutes or so, I decided to keep moving. I down climbed the ridge and put crampons back on. It was nine in the morning and the snow was completely isothermic. Being that I was on a southeast aspect and to climb Steffanson required me to climb steep southeast facing slopes, I decided to call it a day. Personally, I didn't really care. I was stoked to bag Johansen and knew that anything besides that was a bonus. In an hour I was back at camp, beaming. The girls congratulated me on the successful summit and it was nice to share our successful journeys with each other. It was dope to see three badass chicks getting after it in the peaks. They were on one hell of a mission. It was also good they ran into me because I was able to give them the beta on how to find the rock bridge on their GPS (even though they would have found it anyways). I went back to camp, had breakfast, packed up and left. A storm was coming in and there was no point lingering. That night I slept in a fully packed Daleys Hut. The following morning I put one foot in front of the other for five hours and reached the end of the trip, exhausted and excited to pay a visit to Miss Woollys. Happy days...
- Mount Aurum
Date: December 27 - 29, 2023 Location: Richardson Mountains, Mount Aurum Recreation Reserve, Queenstown, Otago, New Zealand Total Trip Distance: 22.19 mi / 35.7 km Total Elevation Gain : 6,778 ft / 2,066 m Trip Duration: 3 days Team: Solo Field Notes: The Mount Aurum Reserve is stunning and the view from the summit top notch. Archie's Hut is nestled right below Mount Aurum and Bullendale Hut has an open fire place. Once past both huts there is no track. Mount Aurum is a straightforward scramble when following the correct route. Prepare to have wet feet on the approach up Skippers Creek. Vehicle clearance is strongly advised to reach the trailhead. Rating: 1, I Download GPX File Google Maps Location Happy days...
- Lorn Peak
Date: January 18, 2024 Location: Tapuae-o-Uenuku / Hector Mountains, Kingston, Otago, New Zealand Total Trip Distance: 7.35 mi / 11.82 km Total Elevation Gain : 4,084 ft / 1,244 m Trip Duration: 4 hours Team: Solo Field Notes: A perfect training hike and / or if you're looking to find solitude. The trail is accessed via Glen Nevis Station Road which is suitable for all vehicles. There is parking at the DOC sign and the trail follows a 4wd track until the 1,150 meter contour. From here, follow the fence line directly the summit. The views over the Hector Mountains, Lake Wakatipu, and the Eyre Mountains are fantastic. Rating: Hiking, trail, basic off trail Download GPX File Google Maps Location Lorn Peak Route Topo The Hector Mountains from Lorn Peak Happy days...
- Brow Peak & Big Hill
Date: October 23, 2023 Location: Arrowtown, Otago, New Zealand Total Trip Distance: 11.19 mi / 18 km Total Elevation Gain : 4,179 ft / 1,274 m Trip Duration: 5 hours 20 min Team: Solo Field Notes: A stunning hike that climbs straight up through golden tussock and along a ridge line with spectacular views in all directions. Plenty of water en route except for the tops. I did this route going clockwise and would recommend the same. Happy days... Download GPX File Google Maps Location Brow Peak and Big Hill Route Topo
- Mount White
Date: December 7, 2023 Location: Hāwea Conservation Park, Haast Highway, Otago, New Zealand Total Trip Distance: 13.5 mi | 21.7 km Total Elevation Gain : 5,900 ft |1,800 m Trip Duration: 7 hours 30 min Team: Solo Field Notes: Parking can be found at a pullout at Boundary Creek. From here, follow the 4wd track until you reach an elevation of 850 meters. Take the obvious leading ridge up through tussock until the ridge continues north towards Mount White. For most of the way there is a deer trail and / or obvious makings of others who have taken this route. There is no water and the entire route is exposed to the sun. Rating: 1, I Download GPX File Google Maps Location Mount White Route Topo Happy days...
- Mount James Walker
Date: July 1-2, 2023 Location: Peter Lougheed Provincial Park, Kananaskis, Alberta, Canada Total Trip Distance: 13.7 mi / 22 km Total Elevation Gain : 4,800 ft / 1,463 m Trip Duration: 2 days Team: With Alex Catalfamo Field Notes: This trip is easily completed in a day. We wanted to break up the long drive and had a strong desire to camp in the alpine. The tarns we camped at were magical. The ascent is straightforward and helmets are not required. The only difficulty is the steep, loose scree on the final 1,000 ft. The summit view was spectacular and there is plenty of water on route. Rating: Class 2 Download GPX File Google Maps Location Mount James Walker Route Map As summer started to take hold, Alex and I began to explore deeper into the Canadian Rockies. This wound up being one of our favorite trips of summer. The approach was beautiful and took only a few hours to get to camp. Our camp-spot located at the tarns in the alpine valley below the summit remains one of the best camping spots of summer. The climb to the summit the following morning was spectacular. We woke up at sunrise and found ourselves above the clouds. There have been a few memorable Canadian summits from this summer... namely, Mount Daly, Mount Niles, and Mount Nelson. However, this one may have topped the lot for me. The clarity in the sky was perfect, we were above the clouds, and were completely engulfed by jagged peaks. Enjoy the photos below and happy days...
- Jay Mountain
Date: October 4, 2023 Location: Adirondack State Park, New York, USA Total Trip Distance: 8.33 mi / 13.40 km Total Elevation Gain : 2,800 ft / 853 m Trip Duration: 4 hours 45 min Team: John Kellogg Field Notes: Once above treeline, the mile and a half long ridge to the true summit of Jay Mountain has some of the most expansive views in all of the Adirondacks. There is no water en route. Rating: Class 1 Download GPX File Google Maps Location Jay Mountain Route Map Fall in the Adirondacks might be here on paper but it sure as hell didn't feel like it. The forecast was calling for temperatures in the 80's and it was early October. After doing the Dix Range last week combined with John not being as avid a hiker as I, we opted to do a half day trip with Jay Mountain. I first came across Jay after doing a gravel ride around the entire mountain last fall which was spectacular. I made a note to come back and climb to the top of the peak. We arrived at the trailhead around 8:30 in the morning after John had consumed enough caffeine to stop the heart of a lion. It had the opposite effect and we set a quick pace to the summit. I also knew that his wife had made chocolate chip cookies and they were sitting in the back of the car for when we get got back. We reached the first viewpoint in a little over an hour and snapped a few photographs. From here the ridge really opens up and there are views of the entire Great Range. The mountains of New York are interesting. It seems as if 99% of the mountain is treed, except for the occasional lookout along the way, with the summits being bare (if the elevation is high enough). Such a contrast to other mountain ranges of the world where you get a ton of views on the way up. This is what makes this area unique and the summits more rewarding. However, Jay is different. It reminds me a lot of hiking Giant Mountain from Chapel Pond. Views almost the entire way. The fall colors were in effect and it seemed like we were more than halfway to peak foliage. The Great Range from Jay The true summit of Jay was not as spectacular as sections of the ridge, but nonetheless it was nice to be on top with a good mate. John and I have been friends since 4 years old. He's my longest and closest friend...not many can say that and I am indeed fortunate. For the last few years we've made it a point (or I've convinced him) to get up to the 'Daks for a good hike. This one turned out to be a classic. Special moments...the views, the weather, fall foliage, uncrowded trails, sandwiches post hike, and a cold swim at Split Rock. As I sat in the cold water the golden sun streamed through the trees. The waterfall crashed down over the rocks. No one else was around. I got a little misty eyed and savored the moment because you wonder how many more of these moments exist in life... Happy days...
- Dix Range
Date: September 27, 2023 Location: Adirondack State Park, High Peaks Region, New York, USA Total Trip Distance: 17.48 mi / 28 km Total Elevation Gain : 5,400 ft / 1,646 m Trip Duration: 10.5 hours Team: Solo Field Notes: The Dix Range is an Adirondack classic. 5 summits, rough terrain, and a long day out. There wasn't any water up on the ridge, but plenty in the valley below. I could see this being hellish in the spring and/or after a rainy period. I started with Macomb first. The parking at Elk Lake only has spots for 20 cars and apparently fills up by 4 am in summer. Rating: Class 1 Download GPX File Google Maps Location Dix Range Route Map The Dix Range is a trip I've wanted to do for quite awhile. I grew up in Albany, New York and the Adirondacks have been fundamental in developing my passion for the outdoors. Most of my early years in the hills were spent hiking in the Daks. Beautiful Adirondacks While I am home visiting family for a few weeks before I fly to New Zealand, my dad let me borrow his truck and I made my way north on a Tuesday. I had a solid weather forecast and fall was knocking on the door. I pulled into the trailhead at Elk Lake Lodge at 8 am and started up. I wasn't feeling 100%. For the last three days I was battling a runny nose and low energy. The four day trip in the Pasayten was just a week ago and in that time I've traveled all the way back from Canada, to Seattle, to New York. I figured I needed to get the blood pumping and this day would surely do the trick. I told myself I wanted to do this day in eight hours (haha) and set a strong all day pace. At just over two hours I was on top of Macomb and had knocked out a little over 2k of vert. I had a homemade breakfast burrito with bacon and eggs and kept moving towards South Dix. As I was going down to the col I remembered how heinous the terrain is in the Adirondacks. Here is my perspective on Adirondack terrain: I've traveled all over the world for the last 10 years. If you look at my interactive map of trips I've been in Idaho, Wyoming, Canada, New Zealand, California, Tasmania, etc. To be fair, this isn't "everywhere", nor is that a goal, but I've been to quite a few places. In my opinion, nowhere in the world has rougher trails than the Adirondacks. I'm not talking about scrambling or mountaineering, just purely trails. It's bloody rough out here. I quickly climbed up South Dix and kept moving towards Grace. There is a one mile stretch between the two peaks and in another twenty five minutes I stood on my third peak. At this point it had been three and a half hours and I had a realization... this was going to be a very long day! I did a quick downward dog and got back into flow, if you could call it that. After retracing my steps back to South Dix I cut right and began the ridge to Hough and Dix. This was my favorite part of the day as the views are unique and open up along the ridge. Just below Hough I met another hiker (only the second the entire day) where I found out the peak is pronounced "Huff." I was now enlightened and scrambled to the top of my fourth peak of the day. I enjoyed a quick snack and kept moving. Of course the trail dropped down another 400 feet and I began the final 1,000 foot climb to the top of Dix. I set a casual pace and went up. At the top of the Beck-horn the views were my favorite of the trip. I could see the entire Great Range, Giant, Rocky Peak Ridge, the Santanoni Range, the Southern Adirondacks, Whiteface, and many more. Holy cripe. And to have it all alone was a treat. At this point it was 6.5 hours on the move. I knew that the way out was going to be a complete slog, so I took a solid rest and refueled. Ahead of me lay a 2,600 foot descent to the valley floor, followed by another 4 miles. This was going to suck, no doubt about it. Fast forward and I was at the valley bottom. It sucked worse than I thought. I took another break as my legs were feeling pretty cooked at this point. I kept walking and ran into the beautiful Lillian Brook. Cold water! I got completely naked and submerged my legs and feet into the icy magic. Feeling recharged I walked the final 4-ish miles back to the car, ending the day just on the stroke of 10.5 hours. This was the longest day I've had in the mountains in a long time. The thing about the Adirondacks is that for many of the peaks, there can be quite a long approach. Definitely a contrast to many of the trips I did in Canada this summer. All in all, a classic day out in the Daks. Happy days...
- Wildcat, Rolo, Osceola, & Old Trail Peak
Date: September 16-19, 2023 Location: Pasayten Wilderness, Washington State, USA Total Trip Distance: 31.42 mi / 50.56 km Total Elevation Gain : 9,814 ft / 2,991 m Trip Duration: 4 Days Team: With Alex Catalfamo Field Notes: An incredible 4-day trip over remote, rugged terrain that includes a 6 mile long alpine ridge connecting two summits with a class 3 scramble. Osceola peak makes a worthy objective as well with absolutely stunning views over the Pasayten Wilderness. Water is abundant (except on the ridge lines) and the camp spots quiet and undisturbed. The Pasayten is a place I hope to revisit in the future. Rating: Class 2 / 3 Download GPX File Google Maps Location Wildcat, Rolo, Osceola, Old Trail Peak Route Map On Friday we left for the open road and left behind a special three month stint in Fernie, British Columbia. This summer had been a classic. I got to live with one of my closest friends, we didn't kill each other, and we went on tons of incredible trips in the Canadian Rockies. All of this was just training in my mind as my ultimate goal is to be back in the Southern Alps of New Zealand. To be honest, it's been hard to be present this summer...even with all the incredible trips. The stronger I felt, the more excited I became to return to New Zealand in October. As we drove back to Seattle to return our rental car we had one final destination: The Pasayten. The Pasayten Wilderness from Mount Rolo The Pasayten Wilderness is a 531,000 acre wilderness zone that has more than 150 peaks above 7,500 feet in elevation. The area is a habitat for deer, moose, mountain goats, bighorn sheep, the gray wolf, and is home to the largest population of lynx in the Lower 48. This is my type of trip. Off the beaten path. Remote. Quiet. We drove up the road to the "famous" Slate Pass and were surprised to see a lot of cars. There were a shit ton of cars actually. We quickly packed up our belongings and got started. It was two in the afternoon and the temperature was in the mid 60's. We had a near perfect weather forecast for the next four days. It felt like we could do no wrong this summer. Alex descending Slate Pass From Slate Pass we descended down to the Middle Fork of the Pasayten River and then headed north up Robinson's Creek. After 5 miles or so, we turned right and made the ascent up to Furguson Lake. When we arrived at the lake, the sun was setting and the temperature was dropping off. I knew it was now or never so I jumped into the lake. Cold magic. We set up our sleeping arrangements for the night, collected firewood, and got a fire going. We hung out by the fire accompanied by the wind, trees, and last light hitting the western slopes of Wildcat Mountain. You could feel it - this was going to be a spectacular trip. By nine I was completely fried and went to go to bed. As I was drifting off I heard pounding on the ground near me and I shot up out of bed... "HOLY SHIT!" I scrambled to get my headlamp and turn it on. I flashed it in all directions while Alex was asking me what the hell was going on. It was a deer. Jesus. The deer scampered off into the woods. Fifteen minutes later the pounding came back and on went the headlamp. The deer again. This scenario repeated itself (and no, I'm not kidding) until three in the morning. This deer would come right into our camp. I'm not sure if this was where it feeds, or sleeps, or both...but it would not leave us alone. Alex was particularly bothered. We woke up to cloudy skies on day two. As we had breakfast I realized it was wildfire smoke. I think we were a bit downcast because we thought we had left that behind in Canada. As we worked up the climbers right ridge of Wildcat and got above treeline, the sky was blanketed in smoke. There was still a view and we made our way to the summit. We both agreed that "it is what it is" and vowed to make the best of it. Alex on the summit of Wildcat Mountain The summit of Wildcat has some amazing views, even though visibility was clearly limited. We looked north in anticipation at the alpine ridge that awaited us. We made our way off of the summit and took on the ridge. Almost immediately we were met by loose, crumbly rock combined with loose terrain. I hoped this wouldn't be the theme for the day. It turned out that the majority of the ridge was nice going. Most of the ridge was nothing more than a class 2 scramble with some sections of class 3 that I will describe later on. An added bonus was that the more time we spent on the ridge, the more the weather cleared. A few hours later we had perfect visibility and could see the glaciers in the Northern Cascades. Just in time for the summit of Rolo. We easily bypassed a tricky section and made our way up the south ridge of Rolo. The summit was spectacular. Just a few hours ago we woke up in wildfire smoke and now we stood alone atop a 7,800 foot peak in perfect conditions. This area was magic and I was drooling just thinking of the backcountry ski potential out here. Mountains surrounded us in all directions. After a nice break on the summit we decided to head down to camp at Lake Doris. The crux of this entire route is coming down the North Ridge of Rolo. There were some very steep and exposed sections where a fall would not be a good idea. This is where the route becomes class 3. However, navigation is easy and we just stayed on the North Ridge. Anytime it got beyond class 3, we simply found easier terrain to bypass it. Six hours on the move with overnight packs on loose rock and scree had me looking forward to getting to camp. Just before we hit the seventh hour, we arrived at the stunning Lake Doris. The larches were starting to turn a golden color, the lake was crystal clear, and there wasn't a soul in sight. You could tell fall was knocking on the door waiting to be let in. We set up camp so we had a view of the surrounding peaks - Osceola, Largo, Blackcap, and the stunning Monument Peak. Alex got to work with the fire and I soaked my legs in the lake. Dinner was a steaming hot red curry with chicken. The fire crackled, the wind blew, and the earth turned. All was well with the world. My body baked in the glory of rest from a day spent working in the hills and my belly was full. There is not much else a man needs. Camp, night two The tarp tent flapped noisily as it was battered by strong winds. At least I had slept for a solid five to six hours. Little did I know Alex hadn't slept a wink. It was 3 am and I willed myself back to sleep for a few hours. Eventually we got up, quickly packed up camp, stashed our gear, and headed for Osceola Peak. From camp, there is a loose trail that sidles along the slopes of Osceola. At the bottom of a forested gully there is a small cairn and a path that leads up towards the peak. Take this as it travels diagonally right up the mountain. Once above treeline travel remains straightforward as we angled directly at the face of the mountain. Incredible morning light Above the forest, the views were nothing short of spectacular. The clouds mixed with the early morning light and blue skies. A photographers dream. The higher we climbed, the more inspiring it became. The view of Lake Doris and Mount Rolo was just freaking awesome. As we crested the ridge, we reached the false summit. Five more minutes had us standing on the true summit with a 360 degree view, all alone. It's hard to describe the feelings and sights of being on a remote peak with such spectacular views, so I'll include a bunch of photos below. But this is one of my favorite summits of summer. The stunning summit of Osceola Peak We stayed on the summit for awhile. If it wasn't for the cold wind I would've built a shelter up there and never left. Coming back down to earth is always the hardest part. Alex led the way down and I soon followed. Travel is fastest by sticking close to the skiers right ridge. Our ascent route up Osceola from Lake Doris At camp we packed up our things and made a warm breakfast. To my dismay, an animal had chewed through my folding cup and put my morning coffee in jeopardy. For those that love coffee, this is a serious problem. However, I found a solution (addicts always get their fix). The morning was really opening up now. The weather was perfect for hiking. We left Lake Doris and made the descent past Freds Lake to the valley bottom until we met Robinson's Creek. We then traveled south back towards Slate Pass. After close to eight hours on the move we set up camp at the Middle Fork of the Pasayten River and enjoyed one last fire. The trip had been a wild success. The night was our coldest yet. After another night of poor sleep, Alex got up and made a fire at 4 am. I was out of my sleeping bag by 5 to sit by the fire and made a quick breakfast. I was sad to go and didn't want to leave the wilderness. It had been a perfect trip. Under the glow of dawn, we worked up towards Slate Pass. We considered bagging Haystack Mountain or Slate Peak, but it was lightly snowing and the views obstructed. I passed on the invitation. As we got near the top of the pass it really opened up and again, the lighting was amazing. At the top I suggested we bag Old Trail Peak. Alex needed no convincing and we left our bags at the car. It took about thirty minutes or so to stand atop the peak. The last thirty feet or so is a class 3 scramble. The views at the top were great and a fitting way to end a sensational trip. Happy days...
- Mount Nelson
Date: September 9-10, 2023 Location: Purcell Mountains, British Columbia, Canada Total Trip Distance: 10.36 mi / 16.67 km Total Elevation Gain : 6,400 ft / 1,951 m Trip Duration: Day 1: 2 hours 17 min | Day 2: 6 hours 55 min Team: With Alex Catalfamo Field Notes: We did this trip with a fast and light bivy about 1,000 meters below the summit. However, most will do this in one long day. This is a very steep mountain. However, if one pays attention to route-finding it is nothing more than class 3 scrambling. If you find yourself on class 4 terrain you're off route. There is plenty of water on the ascent until the actual climb begins on the southwest face. Rating: Class 3 Download GPX File Google Maps Location Mount Nelson Route Map Last Minute Decisions It's funny that one of the best trips of summer almost didn't happen. This was our final weekend in Canada. Alex and I are heading back home to a wedding and then I'm going to move to New Zealand in October. So with one last weekend, we wanted to continue our flow of great trips. We talked about what we wanted to do this weekend and I was in favor of an overnight trip because the weather was perfect. Alex had talked about doing Nelson all summer, but this is really a day trip. I figured we were going to do a traverse of Warrior and Cordonnier in Peter Lougheed National Park, but Alex wanted to go somewhere different. The plan was then to drive up to Glacier National Park and climb Mount Afton. It looks to be a spectacular climb but is also a day trip. When I woke up in the morning I thought, "why the fuck are we driving 5 hours to do a day trip?" There is no right or wrong here - it's all personal preference. Alex and I have different goals and motivations in the mountains. We all do. For me personally, the last thing I want to do is work all week and be gifted a near perfect weather forecast, only to drive five hours to a place to do a day trip when there is so much to do with a significantly shorter drive. This would mean we would spend more time driving than hiking. I figured I would just suck it up and go with it as Alex wanted to go to a place we've never been before leaving Canada. Again - different goals and motivations. Two hours into the drive with three more hours to go I was thinking what a mistake this was going to be and wanted to get out of the car. Then something magical happened. We were nearing Invermere I looked to my left and saw a massive, stunning, beautiful peak. Immediately I thought, "that's Mount Nelson." I checked my GPS and sure enough it was. I looked at Alex and suggested we should climb that instead. About a minute or two of back and forth he made a u-turn. He didn't need convincing anyways. We were going to climb Nelson, I was going to avoid driving another three hours, and Alex was going to summit the peak he desired most. Happy. Days. Beautiful Purcells A Very Steep Approach After our low clearance, 2wd car bottomed out on Delphine Creek Road we reached the trailhead. My energy was back and I was psyched to head up the mountain. I was a bit nervous I'll admit. From the road, Nelson is a beast. I had read a few trip reports and others have made it out to be a "no fall extreme exposure" type of climb. After a quick stretch, we packed up our things and got moving. I was experimenting this weekend with a fast and light approach. I was able to fit all of my gear into a Black Diamond Speed 22 liter pack (and I didn't have to cram anything in). The more and more I am in the mountains, the less I want to carry things around. I have a very minimalist mindset and want to be light on my feet. The beauty of this trip was getting to bring the tarp instead of a tent. Once we left our car, the trail starts by crossing over a creek and then turning immediately to the climbers right. If the trail isn't obvious, there is a cairn and orange flagging tape. From here, the trail is relentlessly up for about 650 meters. I'm not kidding, this is the steepest trail I've ever been on in my life. We did 650 meters in one hour and we were not moving fast by any means. On our way up we passed two different groups - a couple and a solo dude. Neither had summited as both had issues with route finding. Before doing the trip, Alex and I had both looked at the description and reviews of Mount Nelson on the All Trails app. Personally, I try to avoid using that app for beta on climbs / scrambles. The reason is because the majority of the people using that app have very limited experience in the mountains and will provide information that is either not useful or can hinder a trip. Scrambling is not hiking just like alpine climbing is not scrambling. Neither is "superior" but requires a different level of fitness, skills, and experience. All Trails is a hiking app, after all. On one review of Nelson in the All Trails app, a person wrote "fears like I've never experienced." This is written by a person who most likely did their first ever scramble on Nelson (nothing wrong with that). As I'll write later on, this is nothing more than a class 3 scramble. This is not to be judgemental but rather to aid in better trip planning (which is why I don't use All Trails for these types of trips). Better trip planning results in more summits, less headaches, less danger, and less time off route - all of which leads to a better experience. This is something I really value after spending a lot of my early years missing out on summits because of poor trip planning. Again - to each their own. The mountains began to show themselves After the first 650 meters, the trail mellows and finds its way into a basin. We broke out of the trees and got a view of Mount Nelson in the distance. It is indeed a steep mountain. We kept climbing up, following a stream on our right. After climbing 1,000 meters from the valley floor, we eyed the last patch of green in the valley and made camp. Alex breaking treeline. Nelson back right. The night was simply perfect. There was almost no wind, there were no bugs, and the temp really cooled off. We didn't even pitch the tarp and opted to sleep under the stars. We had our first fire of the whole summer in a protected cove of some rocks and watched the stars slowly come out overhead. It was probably the best night of the whole summer and I went to bed thanking God for the gift of being alive. After counting five shooting stars I tried my best to fall asleep. Mount Nelson "Hahahahaha." It was 4 am and I was wondering why Alex was laughing just like he was wondering why I was moving around at 4 am. It was cold. When I walked near his bag he broke out in laughter and said that he hadn't slept all night. Neither had I. We've been cursed this summer with very poor sleep in the hills. Oh well! We were absolutely stoked to go up Nelson. I grabbed the fuel can and made a coffee. I sat in my sleeping bag, laid back against a patch of grass, and drank a delicious hot coffee under a blanket of stars. You wonder in these moments if you're dreaming. Alex then had the idea of the summer and relight the fire from last night. So here we are at 4:30 in the morning under the silence of a looming dawn and a looming Mount Nelson. Perfection. I almost enjoy these moments more than the summits. Once we had enough light to move without headlamps we made our way towards Nelson. As we neared the foot of the southwest face Alex commented, "most mountains get less steep the closer you get, Nelson seems to get steeper the closer you get." This seemed to be the case. At the bottom of the face I thought I had scoped a good line to the summit block. There is an obvious gully / rock ramp that leads through the cliff bands. At the top of the gully it meets a wall. From here, go climbers right to bypass this wall and climb above it. Then sidle back climbers left onto the face where unimpeded travel meets the summit block. From there, we would make a decision on how to reach the top. Our route up the SW Face of Mount Nelson We took this proposed route and began our climb. Indeed it was steep, but never more than class 3 scrambling. I only used my hands for balance, but not for climbing. At the top of the gully, we sidled climbers right and got onto the face. From here it was a straight grind to reach the summit block. The view behind us towards Sultana Peak was amazing. At the top of the face we reached the summit block. There was a big cairn that someone had marked with a piece of flagging tape indicating the route. The route goes up to the climbers left through an obvious gap in the face. I looked at Alex - "take us to the summit bro." You could tell how fired up he was to be here. He had wanted to bag Nelson all summer and here we were just fifty meters from the top! Alex on the summit of Mount Nelson Alex charged up the easy class 3 slopes and yelled down for me to come next. Once past this obstacle, the climb goes up easy ledges to reach the summit ridge. Alex cheered out as he spotted the cross on the summit. I snapped a photo of him alone on the peak and then went to join him. Mount Nelson, 9 am, all alone in the Purcells. Magic. Descent This peak made for my 19th Canadian summit this summer. For Alex, number 20. Before we came out here I didn't think that we would have had so many amazing trips. It seems like everything fell into place. Nelson was just another domino to fall. Perfect weather, perfect camp spot, no issues with route finding, and a good slog. We snapped our final photos and made the decision to walk the 2,000 meters back down to the car. An epic end to summer - the summit of Mount Nelson We practiced good mountain sense by not descending on top of each other for the descent. When coming off the face, one has to take care here. The rockfall danger here is no joke. It seems like the Canadian Rockies are one massive pile of loose rocks. Both of our new shoes are literally falling apart after five or six weeks of scrambling out here. The terrain is super rough. I'll spare the details, but I was relieved to get off the face as its rough going. We got to the bottom and I stripped down to just shorts for the walk out. We rock hopped our way back to camp and threw our things into our bags. The final jaunt back to the car was one thing - steep. My quads were annihilated on the final 650 meter descent to the car. Holy shit! This was so steep - did I say that enough? At the car we had one last objective - a cold plunge. If anyone actually reads this blog besides my mom, you know I love cold water. So we found a pullout and laid down into the frigid Toby Creek, ending an epic final trip of glorious Canadian summer peak bagging. Happy days...
- Castle Mountain
Date: June 28, 2023 Location: Fernie, British Columbia, Canada Total Trip Distance: 7.5 mi / 12.07 km Total Elevation Gain : 2,069 ft / 631 m Trip Duration: 3 hr 15 min Team: Solo Field Notes: This trail felt like it was meant more for biking than hiking. A short and easy hike to a nice viewpoint above the town of Mount Fernie. Rating: Class 1 Download GPX File Google Maps Location Castle Mountain Route Map Authors Note: While there are plenty of great hikes to do in Fernie, the trail up Castle Mountain felt like it was meant more for mountain biking than hiking. Most of the trail is on biking paths. The views from the summit are very nice with nice views of many great trips in the Fernie area: True Mount Fernie, Mount Fernie Ridge, Mount Proctor, Three Sisters, Mount Hosmer, Polar Peak, and more. If you're looking for a more detailed trip report of Castle Mountain, this blog has a nice write up. The view from Castle Mountain
- Mount Alderson, Mount Carthew
Date: August 27, 2023 Location: Waterton Lakes National Park, Alberta, Canada Total Trip Distance: 18.34 mi / 29.51 km Total Elevation Gain : 6,127 ft / 1,868 m Trip Duration: 2 days Team: With Alex Catalfamo Field Notes: The Alderson / Carthew Lakes area makes for great camping with a short approach. From there, the mountains above area easily accessible being no more than a simple hike. We carried almost no water as there is plenty of water the entire route. This area is quite unique and the views spectacular. Rating: Class 1 Download GPX File Google Maps Location Mount Alderson Mount Carthew Route Map Approach to Carthew Lakes With only two weekends left before Alex and I call it an end to an epic Canadian summer of peak-bagging, we decided to head down south one last time. Our objective was a set of peaks off of the well-known Carthew Alderson trail. We had been in this area before, having done Forum Peak and Akamina Ridge. However, there was a decent amount of smoke that weekend and we wondered what this zone would be like in clear weather. We arrived at the Cameron Falls trailhead on a beautiful Saturday afternoon. We knew the approach would be relatively quick so we got a late afternoon start. I was pretty surprised by the amount of visitors and tourists in the area. With that said, Waterton is beautiful and we were just another two digits adding to the crowd. As we traveled west towards our camp for the night, I couldn't help but think about how epic it would be to do the Great Divide Trail. A few of the trips we've done this summer have been on sections of the trail. The whole 1,123 kilometers seems to pass through jaw dropping sections of the Canadian Rockies. The trail slowly climbed in elevation and I'm glad we aren't allergic to pollen because it was virtually snowing. The wind was pretty strong and it blew the powdery grains everywhere. It made for a beautiful look as the sun shined down from the peaks above. We climbed higher and the trail weaved through poplar and coniferous forest. At every creek crossing I bent down and drank from natures faucet. It was a beautiful approach. Nearing two hours without a break, we stopped at the campsite for Alderson Lake and ate a snack. We were another 300 meters in elevation to camp. Forty-five windy minutes later and we found ourselves staring at the white capped Carthew Lakes. It was definitely a gem of an area. We made our way down towards the trees at the edge of the lake and found a relatively sheltered camp for the night. Arriving at Carthew Lakes We relaxed as the sun warmed the tent, eventually losing height before dipping below the horizon. This in turn dialed down the wind a few notches and we enjoyed a perfect sunset. We slept without a rain fly and the tent door fully open. I gazed up at the stars until I fell asleep. Sunset at Carthew Lakes Mount Alderson Alex and I haven't slept great this summer in the mountains. I woke up at 1am ready to rock and roll. We had a plan to be up on Alderson for sunrise. With six hours to go, I wrestled myself back to "sleep" - although I wouldn't actually call it that. At 4 am I asked Alex when was sunrise. He said about 6:45 and then I passed out deeply for the next two hours. At six I got up, made a coffee, and we were on our way. Alderson is a quick and easy climb from Carthew Lakes. We went to the western end of the first lake, took a left, and went straight up the face that meets the ridge. There is a trail the entire way. As we made our way up the peak, the sunrise was incredible. There wasn't a soul around and the sky was smoke free. The higher we climbed the better the views became. The early morning sun produced an incredible golden light that light up Buchanan Ridge. About an hour and a half later, we stood alone on Mount Alderson. My favorite view was looking east towards Bertha Lake. I hid behind the summit cairn to block the wind while Alex enjoyed the views. There was a layer between the clouds where the golden light of morning was breaking through. Behind us, the massive peaks of Glacier National Park in Montana towered in the distance. Twenty minutes later we turned our attention to the next objective of the day. Sunrise over Bertha Lake and Mount Richards Mount Carthew We left the summit and took the entire ridge back down to the col between Carthew and Alderson. From the col we made our way up Carthew. This views from here were spectacular. The ridge of Mount Alderson had a reddish color to it, the sky was a mixture of sunlight and dark clouds, and the lakes below added their own unique color to the scene. As the trail worked across the face it finally met the summit ridge. The wind was blowing hard from the West, so once we gained the ridge we got blasted again. Mount Alderson and Carthew Lakes from Mount Carthew A false summit or two later and we were on the top. I tapped the summit with my one remaining hiking pole (the other one had snapped earlier) and made my way a few meters back down the ridge to take shelter from the wind. I sat alone and ate some food while taking in the views to the east. Alex was off scouting out a potential route to Buchanan Ridge. This trip had blown me away. I knew the views would be good - but this was spectacular. There seemed to be so much variety in the mountains, the colors, the sub-alpine from the alpine. Being such a busy trail, we hadn't even seen anyone yet and we were close to four hours into the day. Mount Alderson is stunning from this angle The views from Carthew were our favorite. Unfortunately, one can't live on a summit so we made our way back down to camp. Reversing our steps opened up even more incredible vantage points that we hadn't noticed on the way up. The beautiful Mount Carthew Within an hour or so we were back at camp. Going simple and light on this trip, it took us five minutes to pack up camp. The sun began to finally break through the clouds allowing us to strip down to our base layers. We turned our backs on Carthew Lakes and made the two hour non-stop hike back to the csar and ended a fantastic two day, two peak trip. Happy days... Mount Carthew
- Forum Peak, Akamina Ridge
Date: August 6, 2023 Location: Akamina-Kishinena Provincial Park, British Columbia, Canada Total Trip Distance: 13.84 mi / 22.25 km Total Elevation Gain : 3,961 ft / 1,207 m Trip Duration: 6 hours 45 min Team: With Alex Catalfamo Field Notes: The trail is straightforward and easy to follow for the entire hike except when turning left to bag Forum Peak. No route finding required, just take the easiest path towards the peak on a broad ridge. There are two places for water: a stream before reaching Forum Lake on the approach, and the second stream before reaching Wall Lake on the way out. There is apparently a scramble up Forum Peak which we didn't know about until after our trip was complete. Rating: Class 1 Download GPX File Google Maps Location Forum Peak and Akamina Ridge Route Map Approach Via Forum Lake It was a smokey drive as we made our way east towards Pincher Creek until eventually turning south towards the Waterton Lakes area. We'd never been in this area before and with plenty of smoke in the forecast we went with an option lower on our list of objectives. That being said, this trip didn't disappoint by any means. We started our hike at the Akamina Pass trailhead . The beginning was a gradual incline through some beautiful fireweed - a flower that grows after a wildfire. We passed by a group of bikers that were getting their ass kicked by the incline. It seemed like this was their once-a-year hangout as a friend group and someone had the bright idea of slogging uphill on a bike. Alex and Forum Lake We made a left near the Akamina Creek Campground and climbed higher as the trail went towards Forum Lake. We kept leapfrogging a couple who stopped every five minutes or so for a photo. It became irritating so I eventually just stopped for a long water break. A few minutes later we reached Forum Lake and made our way up the ridge towards Akamina Ridge. Akamina Ridge Forum Peak & Akamina Ridge I didn't realize until after the trip that there is a scramble up the northeast ridge of Forum Peak. So instead we climbed the ridge between Forum and Wall lake on a hiking trail. Then we turned left and made the short walk over to Forum Peak. It seems there are two summits separated by only a few minutes walk so we tagged both as their is a cairn on each. It was still pretty smokey but the views were still great. I would be pretty excited to see this place in clear weather ( and we eventually did ). From the summit of Forum Peak we had some awesome views towards Mount Custer in Montana. We decided to keep moving and retracted our steps back to Akamina Ridge. This was the best part of the day for us - high up on a ridge, all alone, with solid views in all directions. The color of the rock is pretty amazing as well. Patches of red, yellow, brown, orange and even shades of green create a unique color palette. We stopped at the summit of Akamina Ridge for a nice break. We kept imagining what it would be like to look straight into the heart of Glacier National Park in Montana. You can tell there are some big peaks out there. When we felt ready, we continued on. There was a final section of ridge that was just stunning. Alex and Akamina Ridge The trail dipped down to the skiers right before eventually meeting Wall Lake. We filled up our water at a creek, stripped down to our boxers, and went for a swim in Wall Lake. Magical. After a good ten minutes we put on our clothes and decided it was time to go home. It had been a much better day than expected. We were treated to an amazing final section of fireweed. The pictures don't do it justice. The contrast between the purple flower, green grass, and brown trees was mesmerizing. Back at the car there was one last objective. It was time for ice cream. Happy days...
- Ghostrider Mountain
Date: August 26, 2023 Location: Fernie, British Columbia, Canada Total Trip Distance: 5.74 mi / 9.23 km Total Elevation Gain : 3,312 ft / 1,009 m Trip Duration: 4 hours 24 min Team: With Alex Catalfamo Field Notes: Maybe the most accessible scramble in the Fernie area as 99% of this trip is on trail. Although the scrambling is only a short section before reaching the true summit, do not be fooled - it's a solid 40 feet / 12 meters of no-fall class 4 scrambling. A fall here would be catastrophic and the climbing at times is vertical. You could argue the crux is easy class 5. There was still a small stream running at 5,800 feet / 1,767 meters in late August on a low snow year. Rating: Class 4 Download GPX File Google Maps Location Ghostrider Mountain Route Map Approach The Ghostrider Mountain scramble is one of the most popular in the Fernie area. With that being said, when most people think of going up Ghostrider, it is typically via the hike that stops at the false summit. The true summit is about 30 meters higher and is a class 4 / class 5 scramble depending on who you ask. The trail is accessed via Hartley Lake Road that is a bit rough for our low clearance 2wd car, but is totally manageable if you go slow. Being that we've been down this road two times before to do Mount Hosmer and Three Sisters we were at the trailhead in no time. We were surprised to see the small lot almost full! The trail up to Ghostrider is extremely efficient and we found ourselves at the false summit in 1 hour and 45 minutes. Once you break treeline the scenery becomes beautiful with expansive views of Mount Proctor, Three Sisters , Mount Bisaro, and more. As we reached the final ridge connecting to the false summit, you get an amazing view of Mount Hosmer (which is an awesome scramble). Ghostrider Scramble Once at the false summit we eyed up our objective. Not going to lie, I was a bit taken back. There was a near vertical crack and exposed climbing that led up for about 12 meters. The two other people at the false summit eyed us as we put on helmets - "you guys are going up that?" At this point I was in the mindset to just go look at it first and make a decision. We climbed up and around a few short but exposed pinnacles before reaching the base of the crack. Alex climbing across the pinnacles Alex and Mount Hosmer behind As we looked up at the crux I said "holy shit." This was way steeper than I was expecting. Not only steep, it was quite a long section. My heart was pounding. I figured I would work up the first 4 meters and see how I felt. From what I saw, I felt confident in the holds that I could spot from ground level and if there was any issue I could down climb. I took a minute or two visualizing the route and moves. For the sake of this post, let's call this class 4. I think it's really easy to say "it's only class 4." But with that said, there is almost no difference between class 4 and easy class 5. The difference is typically subjective and in the mind. Here's the catch - if you fall on class 4 you're either dead or really badly fucked up. I fell from about 6 meters and shattered my heel bone that took 7 years of obsession and dedication to get to the point where I can even write trip reports again. So don't make mental mistakes. I called down to Alex - "you absolutely can not fall on this." That was more of a note to myself than anything. As I climbed above the crux I worked my way right (barely) to a narrow ledge. From there, I waited for Alex to come up. I was super impressed. He was climbing really well. He looked strong and confident. I think climbing Mount Tekarra solo in icy / snowy conditions gave his mountain confidence a bump. As he reached the ledge I climbed up to the summit. Shortly thereafter, Alex arrived. On the summit of Ghostrider We gave a high-five and took in the views. Honestly, I couldn't enjoy it! I was absolutely nervous about the down climb. Like I said, the steepness and length caught me way off guard. I realized my mind was on a mission to produce fear, so I took control of my breath and quickly visualized successfully down climbing the route. I looked at Alex and said " let's get out of here." He was 100% on the same page and started the down climb first. As mentioned earlier, Alex was looking great today and was at the bottom in no time - "Safe!" Now it was my turn. With heart pounding, I locked into the moment. I down climbed the rock leading to the ledge, worked my way left, and made a move to place my left leg on the opposite side of the crack. From there, I worked my way down to the base. Alex and I both breathed a sigh of relief. Now the endorphins surged. From there we climbed back across the pinnacles and sat on the false summit where we could truly enjoy a well-deserved break and food. If one does go up this route, there is a rappel ring right off the summit to avoid the exposed down climb. We enjoyed our lunch, the clear air, and the company of two other hikers on the summit. Happy days...
- Tombstone Mountain South
Date: August 27, 2023 Location: Peter Lougheed Provincial Park, Kananaskis, Alberta, Canada Total Trip Distance: 12.31 mi / 19.81 km Total Elevation Gain : 3,939 ft / 1200 m Trip Duration: 8 hours 9 min Team: With Alex Catalfamo Field Notes: This is a great scramble! Although airy and exposed at times, the climb up the ridge is straightforward. Hard sections of the ridge can typically be bypassed on the face. The descent gully down the face is fast and highly recommended. Water can be found when crossing the Elbow River. Rating: Class 3 Download GPX File Google Maps Location Tombstone Mountain South Route Map Approach Via Elbow Lake Alex and I were fired up on the idea of back-to-back scrambles this weekend, rather than doing an overnighter. With clear skies in Fernie, we scrambled up to the true summit of Ghostrider Mountain on Saturday. When Sunday gave us another descent forecast, we made the drive up north to give Tombstone Mountain South an ascent. I had originally come across this peak by way of the Explor8tion blog - which is absolutely fantastic if you're looking for scrambles in the Canadian Rockies. We decided on a later start as I had a feeling this scramble wouldn't take much longer than eight hours round trip. So we loaded up and left Fernie around 8:30 am to make the three hour drive up north. After a quick stretch we left the trailhead around 11:45 am and made our way to Elbow Lake. This area is a gem and Elbow Lake seems like a nice place to camp if you have a family (FYI - I don't think it's a quiet campground by any means as I heard children crying and it seemed very busy). Elpoca Mountain As we passed Elbow Lake, I took the view in of Elpoca Mountain. From my perspective it seemed massive and the summit so far away. Were we really climbing just 100 meters less than that today? Perspective is everything and from a distance the ridge on Tombstone looked very steep. Was it really just class 3 scrambling? As we got closer to our objective, we made a slight left to go directly towards Tombstone. We crossed the Elbow River and tried to follow a rough path that goes towards the base of the climb. We kept losing it, but didn't care much as it was easy terrain to navigate and we were very close anyways. I've written about this before, but Gaia GPS is simply amazing. I wonder - how often do you really need a paper map now? A sign of the times. The bushwack above the Piper Pass trail to meet the ridge We popped out of the woods, met with the Piper Pass trail momentarily, and then began our assault uphill. And the assault did not stop for the next 1,100 meters. Sensing we were going to have a nice march in the sun, Alex had the awareness to take a water break in the last chance for shade before we really started climbing. We made a prediction of reaching the summit in 2 hours. Tombstone Mountain Via the South Ridge As we made our way up the ridge, we ran into our first obstacle that looked like a gendarme - a rock pinnacle blocking our route. As we climbed higher it was easily bypassed on the climbers right. The climb is very straightforward and if one has any descent route finding skills there shouldn't be any major issues. Unreal views of Rae Lake and Mount Rae We worked our way up the ridge, enjoying the consistent cool breeze. Any exposed or tricky parts of the ridge were easily bypassed by simply sidling onto the face. I couldn't help but keep looking back and taking photos of Alex. The scenery was just freaking awesome. I felt super energized and strong and was loving this climb. One thing that surprised me was that this scramble wasn't a total scree bash. There were definitely moments of loose rock and scree, but I found the climb to be quite enjoyable. From here we sidled across the face and went up on the climbers left of the brown / gold rock About 250 meters below the summit the ridge becomes much trickier and exposed. We decided to sidle climbers left onto the face, bypassing this section of ridge, and eventually climbing straight up the face. From here we were just 50 meters or so to the summit. A short and scenic ridge walk, a final move and we found ourselves atop the peak all by ourselves. What a moment. One thing to note is that this is not the main summit of Tombstone Mountain. We were a bit fooled by the maps, but the main summit (Tombstone Mountain North) is actually just north and you can look directly at it. It is a beautiful peak that seems to demand a high level of technical skill. What we climbed today is actually 60 meters or so smaller and is referred to as Tombstone Mountain South. Regardless, it's a great prize for anyone who makes the top. The summit of Tombstone South. Tombstone North is the dominant peak. Descent We enjoyed sandwiches, chocolate and a meat stick while soaking in the views. For sure one of my favorite trips of summer. The views are expansive in all directions. Canada sure has some damn good scrambles. After thirty minutes or so on the peak, we reluctantly decided to head down. As we were coming off the summit, I looked straight down the face. It seemed to be a very fast descent with epic scree-skiing potential. I thought I could see the valley bottom which means it wouldn't cliff out (I didn't know that this is the descent route in the Kane scrambles guide). It took Alex and I about two seconds to say "lets go for it." Scree-skiing down the face of Tombstone South An hour later we were at the valley floor. One hour. The scree-skiing as almost as good as being on skis. Not really, but it was probably the best descent I've ever had off of a mountain without being on skis. One important note about the descent is to traverse skiers right as you near the big waterfall / chasm (so it is on your left for the descent). We emptied our shoes of scree for the last time and met up with the Piper Pass trail. We followed this for a bit until we found the turn off back towards Elbow Lake. Just before meeting up with the main trail we took a cold plunge in the Elbow River. Unreal. As we neared the lake, something magical happened. The golden hour appeared. The mountains were cloaked in that beautiful summer golden glow. Silence fell. No one was on the trails. The temperature dropped. An owl called out in the fading light. Tears filled my eyes. This is why. Only in the nature are things are what they are. And only here can one find the absolute truth. Happy days... Golden Hour at the Elbow River. Simply magic.
- Mount Fernie Ridge
Date: June 20 & July 5, 2023 Location: Fernie, British Columbia, Canada Total Trip Distance: 5.95 mi / 9.58 km Total Elevation Gain : 3,100 ft / 945 m Trip Duration: 3 hours 30 min Team: With Alex Catalfamo Field Notes: A short and steep hike to a viewpoint on the ridge of Mount Fernie. One could climb higher and explore further along the ridge which turns into a scramble. Makes for a great half-day training hike. Rating: Class 1 Download GPX File Google Maps Location Mount Fernie Ridge Route Map Mount Fernie Ridge Hike Note: This trail is not to be confused with the true summit of Mount Fernie, where a detailed trip report can be found here. On the Fernie tourism website, they have a guide to hiking Mount Fernie where they describe the hike ending at the summit. Once we actually completed this hike, we realized this is indeed not the summit. Rather, the hike just ends at a viewpoint along the ridge. That hike is described below. However, if you are looking to reach the true summit of Mount Fernie (which is a fun scramble), click here. This trail makes for a great half-day training hike, so Alex and I decided to get this one in before we started work around noon. The trailhead is just a convenient two minute drive from our house. The trailhead parking is at the end of a col de sac and starts up a gravel road. We walked for a few minutes until turning left where a big sign indicates the start of the hike. The trail is very efficient and straight up. We've actually done this hike two different times, and the first time caught me by surprise...it's actually quite steep! Like I said, excellent training hike. The trail eventually pops out of the woods after about 2,000 feet and crosses some avalanche chutes before reaching the bench. The views are very nice if you climb either left or right once reaching the ridge. I'd recommend exploring farther along the Mount Fernie Ridge (heading in the direction of Island Lake Lodge) for excellent views of the true Mount Fernie, Mount Proctor, Three Sisters, and the Lizard Range. Happy days...
- Excelsior Mountain, Mount Tekarra
Date: August 18 - 20, 2023 Location: Jasper National Park, Alberta, Canada Total Trip Distance: 26.88 mi / 43.25 km Total Elevation Gain : 7,356 ft / 2,242 m Trip Duration: 3 days Team: With Alex Catalfamo Field Notes: Excelsior Mountain is a straightforward scramble with little exposure and steepness. As indicted in the trip notes below, make sure to take the climbers left ridge to the col between Excelsior and Centre to avoid a horrible boulder field. I bailed 1,000 feet below the summit of Tekarra the following morning as I woke up with flu-like conditions. Rating: Excelsior, Class 2 Download GPX File Google Maps Location Smoke, Rain, and Snow A few weeks ago Alex had come up with the idea of going to Jasper. Personally, I did not want to drive seven hours one-way when we have such fantastic mountains within a three hour radius. However, I was easily convinced by a waitress at a Mexican restaurant one night. Secondly, the Icefield Parkway is apparently a classic drive. Being in Canada for just the summer we had to commit (or really, I had to commit). Alex had come up with this trip and wanted to bag a few peaks off of the Skyline trail. We took three days off of work, woke up early on Friday, and made the seven hour drive north. The forecast wasn't incredibly inspiring. The smoke from the wildfires was particularly bad and the forecast for our hike in was calling for heavy snow and rain. By the time we had driven an hour from Fernie, we were socked in with heavy smoke for the next four hours. We couldn't even see the mountains in front of us. What was once heavy smoke turned into heavy rain. We drove the entire Icefield Parkway in torrential freezing rain. Seven hours later we were in Jasper and the sky looked to be clearing. We started hiking on the Skyline Trail that heads up to Signal Mountain. This is probably the easiest 3,000 feet you could even climb in your life. The grade is so casual I could've done 10,000. As we neared the junction to go towards Tekarra camp, the rain started coming down. Then the rain turned to snow. Then the snow really started coming down. You gotta love the mountains. We arrived at Tekarra camp with only one other person there and a couple inches of snow on the ground. We were pretty cold, camp, and set up camp quickly. I love the feeling of eating a hot meal in your sleeping bad while watching steam fill the tent, blood pushing through your body to get warm. Excelsior Mountain The good thing about the cold weather is we slept like dogs. I think we got about seven hours each so we were thrilled. There was quite a bit of heavy fog / cloud in the valley so we took our time having breakfast, stretched out, and even did some Wim Hof in the tent. By 9 am we decided to make a move. As soon as we departed the skies cleared. We followed the Skyline trail until you reach a patch of trees just before reaching the ridge of Centre Mountain that meets the trail. We took a left here and entered the basin between Excelsior and Centre. From here, it is important to work climbers left and gain the ridge made of alpine scrub / rock rather than the massive boulder field on the climbers right hand side. This should be extremely obvious. At first, we didn't go climbers left hard enough and were messing around on the boulders. I had us drop down a bit and gain the opposite ridge on the climbers left. What a difference! Smooth, easy travel led us to the col between Excelsior and Centre. Our route up Excelsior Mountain From the col, the climbing is never more than class 2 scrambling. We brought helmets and I felt it wasn't really necessary, but to each there own. There is an obvious ledge (as seen in the photo) that we easily bypassed by sidling left underneath it. Once passed this obvious ledge, we climbed straight up to gain the summit ridge. Our only difficulty was the 2 inches of fresh snow on top of loose rocks, so care was to be taken. Soon enough we were standing on the summit with clouds obscuring many of the surrounding peaks. At the col, Centre Mountain behind One could imagine the views would be quite special on a clear day. We hung out for a bit, enjoyed the silence, snapped obligatory summit photos, and made our way back to camp. Coming down off Excelsior Mount Tekarra We arrived back at camp at 2:30 and casually took an hour to pack things up. We had eyed a tarn on the map about 1,500 feet below Tekarra and decided to move camp for an easier summit day. It took about an hour to reach this "high camp" from Tekarra camp. I'm glad we made the move, it was beautiful and very peaceful. As we arrived at camp, I found myself feeling run down and unwell. I figured it was the shitty food I had been eating for the last two days. So what did I do? I ate two packages of some ramen noodle type of thing, stretched out, and went to bed. I fell asleep rather quickly but woke up at 1:30 in the morning with my heart pounding and my body feeling very tired. It felt as if I was coming down with the flu. I attempted to calm my mind, focus on my breathing, and get back to sleep. By 5:30 it was time to get up as we had a mountain to summit and a seven hour drive ahead of us. I felt extremely run down and had no energy. Fuck. It was the first time I was "sick" in three years. I figured I'd still give it a go and see what happened once I started moving. There was no improvement. I felt nauseous, weak, and dizzy. 1,000 feet from the summit and an icy, snow covered scree gully ahead of us and I decided this was my finish line. I was also slowing Alex down and knew he wanted to bag this peak. I told him I'd wait for him in camp. Personally, I have no issue turning around in the mountains. Of course I want the summit, but bad things happen in the mountains when one doesn't pay attention. The mountain gives signs, the body gives signs, and one's intuition gives signs. Today, the mountain conditions were shit for scrambling. Icy, steep, snow covered gully. I watched as Alex climbed and knocked off rocks that screamed down below where I would've been climbing. Safer for him to be solo. My body hurt. It was tired and needed rest. My intuition spoke clearly - this isn't your day. I've made a lot of mistakes in the mountain and have gotten away unscathed (except that one time I shattered my foot falling 20 feet - that fucked me up). Also, I love climbing mountains...but I've learned my happiness doesn't depend on it. I'm at peace with not summiting every mountain I try to climb. Some people are okay with that internally, some are not. There is no right or wrong - only consequences. I made my way back down to camp and went back to bed. It felt nice to layer Alex's bag on top of mine and feel the tent warm up with the rising sun. Unfortunately, wildfire smoke was coming back with a vengeance. Alex said it totally obscured the summit view. By 10 Alex was back at camp. I had a coffee, we quickly packed camp and made the 4 hour non-stop walk out to the car. Not going to lie - I felt like shit. The drive home was not fun and I almost puked. Oddly enough, I woke up the next morning after sleeping ten and a half hours and felt amazing. Life is a complete mystery. Happy days...
- Mount Hosmer
Date: June 24, 2023 Location: Fernie, British Columbia, Canada Total Trip Distance: 8.53 mi / 13.73 km Total Elevation Gain : 4,188 ft / 1,277 m Trip Duration: 6 hours Team: With Alex Catalfamo Field Notes: This is one of my favorite off-trail hikes / scrambles in the Fernie area. Accessible from town and a very efficient route to the summit. The only difficulty is the summit ridge, which is straightforward and easy off-trail hiking / scrambling. A helmet is not required. There is no water on route. Rating: Class 2 Download GPX File Google Maps Location Mount Hosmer Route Map Approach Alex and I arrived in town about a week before we did this trip and we were frothing to get up high. I had spent the last six months in Hawaii working with the most incredible healer and friend, Jack Fonderwhite. He was helping to get my body back to climbing mountains after a seven year recovery process from a big injury, but that's a story for another day. Point is - I hadn't been in big mountains in a long time. Probably somewhere close to three years. We did a warm up on Mount Fernie Ridge on Wednesday and decided on Hosmer for the weekend. Hartley Lake Road isn't great but it's manageable with a low clearance, 2wd car. We went slow and found our way around the potholes. About a twenty minute drive from town and we were the only car at the parking lot. With the sun heating up early, we wasted no time and started up. Views towards Mount Proctor and Three Sisters The trail is efficient. We went straight up with views of Proctor and Three Sisters gradually becoming better and better. The higher we climbed, the higher my spirit rose. It felt great to be back in the mountains. At the col just below Ghostrider Mountain the views really open up from a ledge. It was cool to see the accessibility of mountain trips in Fernie. Right from town you have a lot of great day trips and we felt as if we made the right choice for this to be our base camp for summer. Alex reaching the col below Ghostrider Mountain Mount Hosmer From the col below Ghostrider one needs to pay attention to route-finding to make the correct left hand turn for Hosmer. I use the Gaia app for navigation in the mountains and it has never let me down (I also have a Garmin inReach but only use this for emergency). The route map photo at the top of the page is the exact route we took, so look for a very faint herd path to your left by a grassy area. As you follow this rough path, it diverts into the woods. The trail becomes marked by orange flagging tape. The faint trail to the left leads towards Hosmer We followed this trail and the flagging tape until it became harder to follow as we entered the basin. From here, we bushwhacked straight up the basin through the woods and travel was simple. Eventually, we made a left to begin climbing up to meet the summit ridge of Mount Hosmer. The photo below is the ascent route of Mount Hosmer taken from Ghostrider Mountain. Mount Hosmer Ascent Route We took the left turn slightly early and it became pretty steep with loose rocks. Not a big deal, but I'd recommend using the route map photo above which shows the easiest travel to meet the summit ridge (this is what we took on the descent). Travel in the basin until you have a clear view of the climb above and simply pick the easiest route of ascent. Climbing above the basin below Once on the summit ridge, navigation is extremely straightforward. We followed the summit ridge, becoming airy at times, up and over a false summit. This is where it became really fun. The ridge narrows and provides incredible 360 degree views. The ridge is never more than a class 2 scramble - which is off trail, but climbing with your hands. There are steep drop offs on each side which gives it kind of a "lofty" feeling. When we reached the summit, Alex congratulated with me with two simple but powerful words - "welcome back." I thought I'd become very sentimental and emotional to finally stand on a relatively big mountain again, but rather I didn't feel much. It was just good to be back. Finish lines are an illusion and when one reaches any summit, the view is of other summits. It never ends. We signed the summit register, snapped photos, took off our shoes and chilled. It was a perfect day to be in the mountains. When we were ready we made the descent back to the car, taking the same route. Of course, the day ended with a cold soak in the Elk River and plenty of delicious Indian food. Happy days...
- Mount Baldy
Date: August 12, 2023 Location: Fernie, British Columbia, Canada Total Trip Distance: 5.52 mi / 8.88 km Total Elevation Gain : 2,092 ft / 638 m Trip Duration: 2 hours 48 min Team: With Alex Catalfamo Field Notes: A straightforward loop from Island Lake Lodge with beautiful views of the Lizard Range and the northern Ranges. Makes for a great training hike or short day hike. Rating: Class 1 Download GPX File Google Maps Location Mount Baldy Route Map Mount Baldy Loop Alex and I decided to take it easier on Saturday as we wanted to save Sunday for an ascent of the true Mount Fernie . Being that we had never been to Island Lake Lodge, we figured it was a good day to go check it out. We made the twenty or so minute drive from our house in Fernie to the end of the road where the lodge sits. Once at the parking lot, there are hiking trails in all directions. Our route started directly from the parking lot. It was another gorgeous day for hiking, weather in the mid seventies and some clouds to add context to the skies. We set a casual pace and were on the summit in about eighty minutes or so. I thought the views would be blocked by trees, but as you can see from the photos, the views were actually stunning. Pano from the first view point There are two view points on the trail. The first is when you reach the ridge there is a picnic table. You can see the actual summit from here, just another hundred feet higher. We walked up to the summit to check it out, but found the views better from the bench. Either way, not a major difference. I will admit, part of the reason I wanted to head up Baldy was to scope out our potential scramble route up True Mount Fernie for tomorrow... This was a super enjoyable day and the views were better than I had originally thought. Definitely a worthwhile short day hike or a good training day for some vert. Happy days...
- True Mount Fernie (Pt 7,794)
Date: August 13, 2023 Location: Fernie, British Columbia, Canada Total Trip Distance: 10.88 mi / 17.5 km Total Elevation Gain : 4,160 ft / 1,268 m Trip Duration: 6 hours 40 min Team: With Alex Catalfamo Field Notes: It seems it is up for debate whether this is the true summit of Mount Fernie. Many maps have the summit on a smaller peak on the ridge, google maps/earth have the summit at the tallest peak on the ridge. This route takes one to the tallest peak and it is a worthy objective with steep, easy class 2 scrambling. There is no water on route. Large parties may want helmets. Rating: Class 2 Download GPX File Google Maps Location True Mount Fernie Route Photo The True Summit of Mount Fernie Whether or not this is the actual summit remains a mystery. After hiking the Mount Fernie Ridge trail multiple times this summer, Alex and I began to talk about where the true summit actually is. The town tourism website of Fernie shares the details of the hike that "leads to the summit," but in fact is only a hike to a viewpoint on a ridge. I remember one instance where we hiked to this viewpoint and met some locals. When we asked them where the true summit was they looked at us as if we were speaking a foreign language. Continuing with our research, the maps indicate the summit is further along the ridge, requiring an additional scramble (as you can see on the route photo above). However, when searching on google earth, the summit is actually located at the highest point on the ridge (typical of summits), which is where we climbed to. We decided that we would climb to the true summit, regardless of what the maps say, and reach the highest point on the ridge. Independent of what is actually the true summit, we didn't care. We found the tallest peak to be beautiful and figured not many make the trip. Approach This is the second day in a row we found ourselves back at Island Lake Lodge having hiked Mount Baldy the day prior. No doubt this is a great zone and one can only imagine the ski potential here in winter. We started down the road for a bit and then turned left onto the Tamarack trail. I always love the wooded approach before going to climb a peak. Even better was that it was old growth forest - simply magical. The trail began to make it's way up out of the valley at a very gradual pace. Before we knew it, we had easily ascended 1,900 feet and were at the top of the ridge. To our left was the Tamarack summit viewpoint (which we would save for the end of the day), while the trail turned into the Heiko / Mountain Lakes trail. We had some water and continued on. Within another fifteen minutes of walking we got a view of our objective for the day. True Mount Fernie is a beautiful peak and we were excited to make the ascent. The forecast for the day was supposed to be hot, but the temperature was quite nice and we appreciated that. We continued on until we reached the scree gully that I had marked as our ascent route for the climb. It took us two hours to reach this point from the parking lot. Ascent of True Mount Fernie We had a quick bite to eat and assessed our route. There was a bit of unknown. The scree gully climbs straight up and then turns to the climbers right, going out of sight. Just a minute before reaching this spot on the trail, another potential ascent route gets cliffed out. I wasn't overly concerned because if we really needed to, we could retrace our steps on the trail and bush bash to meet the summit ridge. We figured we would be okay and made our way straight up the gully. After a couple hundred feet of climbing, the gully wraps the climbers right. I got a view of what lay ahead and we were golden. At this point, there are two options to reach the second, main scree gully that will take you to the summit ridge. Option one is to stay in the gully and keep climbing another fifty feet or so (gets slightly steeper here). Option two is take a hard climbers right into the brush where you will meet the main gully. Option two made for better travel so we did this. Once in the main gully we powered straight up. It's a classic, steep scree gully. Here, larger parties may want a helmet purely because of other climbers kicking rocks down from above. We climbed in the gully until the final two hundred feet or so, where the gully moves ever so slightly to the climbers left. We avoided this and moved climbers right, finding easier travel through the brush. Once at the col leading to the summit ridge, we took a breath and enjoyed the surroundings. There were excellent views in all directions. We high-fived and were fired up to be here. The final four-hundred feet to the summit was straightforward with a short section of ridge climbing. It's a very short section of ridge with big drop offs on either side - a fall here would be very bad. With that said, it's nothing more than a walk. Summit ridge, True Mount Fernie We wondered if there would be a summit register and / or a cairn on top. Believe it or not - there was both. Funny enough there was only one entry in the summit register - signed just two weeks ago! The entry said something to the effect of, "no matter what the maps say, this is it, the highest point." On the summit of True Mount Fernie The views from the summit were simply awesome. Three Sisters, Proctor, Hosmer, the Crowsnest Range, Fisher Peak, The Lizard Range, it was all there. While Alex signed the summit register I ate a PBJ and took in the views. My favorite peaks have always been the obscure ones. I'm not sure why, maybe it's just an extra feeling of adventure or the unknown. I also love scouting out a peak and using my route finding skills to find the best way to the summit. Once we had our fill at the top, we made our way back down using the same route. The scree gully was particularly shitty, but fortunately one makes quick work of it. On our way back to the trailhead we were both feeling great, so we climbed the short two-hundred feet to the Tamarack summit. We watched as a fire unfolded in Sparwood, the smoke traveling over the Lizard Range. The day ended with a burger, fries, and our ritual plunge in the Elk River. Happy days...
- Polar Peak
Date: August 9, 2023 Location: Fernie, British Columbia, Canada Total Trip Distance: 10.16 mi / 16.35 km Total Elevation Gain : 3,725 ft / 1,135 m Trip Duration: 4 hours 40 min Team: Solo Field Notes: Parking is in the lot right at the base of Fernie Alpine Resort. There are many trails to reach the ridge walk - the simplest being via Summer Road as many of the trails are for mountain bikers. Rating: Class 1 GPX File Google Maps Location Polar Peak Route Map Approach Via Summer Road I was fired up on getting a mid-week hike in as I only did one trip the previous week. British Columbia has been raging with wildfires and experiencing a drought, so I was grateful to wake up to slightly clearer skies. I wanted to go for a solid hike and decided on Polar Peak at Fernie Alpine Resort. The hike is split into two sections. First, the approach via "Summer Road" follows a gravel road. I wish I had my gravel bike! Second, summer road connects with the Polar Peak Ridge Walk trail. This is actually a hiking trail that follows a ridge for close to 2 miles, eventually topping out at the summit. Nice conditions in the morning I made my way up Summer Road, occasionally veering off to go on some of the mountain bike trails. The day I was there I saw zero people. It was actually kind of eerie. Seriously - no one was there. I think I saw two staff the entire day. With that said, the mountain bike trails were downhill trails and they were actually very steep. In hindsight, I think it's better to just stay on Summer Road. If there were bikers I think it'd be quite annoying to stop for a hiker. The day was cooler than normal with rain in the forecast and a slight breeze, which made hiking very pleasant. Soon enough I had reached the end of Summer Road where it meets Lost Boys Cafe. I took the Lost Boys trail where it meets the Polar Peak Ridge Walk. Polar Peak Ridge Walk This is where the actual hiking started and the beauty caught me by surprise. I followed the ridge for nearly two miles with amazing views of the Lizard Range. Storm clouds rolled in, the wind picked up, and rain started coming down. I took a break under a tree, ate a cliff bar, and listened to the silence. The sound of wind coming through the trees is haunting. It's one of those sounds that taps into something very animal, almost spiritual. Something impossible to explain in words. Ridge on Polar Peak I continued to follow the ridge. There isn't much of a trail, instead, rocks have been sprayed red to indicate the way forward. The ridge rolls up and down with the occasional rock hop. At one point, the ridge drops off where one needs to do some light scrambling. The resort actually has cables installed here. This seems overkill, but to each their own. As I reached the final 200 feet to the summit, the rain began to pick up. I hadn't stopped for more than 5 minutes the whole day and was looking forward to taking a break at the summit. However, when I reached the peak the rain really started coming down. I wasn't thrown off in the slightest. We needed rain so bad you could hear the plants just begging for it. I sat down for two minutes in the pouring rain and then decided to head down. I actually didn't bring my hardshell. I usually just take my Patagonia Houdini wind jacket unless there is definite precipitation in the forecast. Today actually had definite precipitation in the forecast, but I still didn't bring my hardshell. You can lead a horse to water but can't make it drink. Oh well. The skies started unloading as I made my way off the summit. Soon I was completely drenched. Either way it made no difference. In two hours time I would be soaking in a hot bath in a warm house. So I made the five mile walk out non-stop back to the car. As I write this the day after, the skies have cleared up dramatically. The rain was much needed. Happy days...
- Eastpost Spire & Cobalt Lake Pass
Date: July 8-9, 2023 Location: Bugaboo Provincial Park, British Columbia, Canada Total Trip Distance: 12.4 mi / 20 km Total Elevation Gain : 4,810 ft / 1,466 m Trip Duration: 2 days Team: With Alex Catalfamo Field Notes: While not difficult in terms of elevation gain / miles that is spread out over two days, the terrain makes up for it. Eastpost Spire is an easy and straightforward class 3 scramble with one exposed move (some would rate this a class 4 move), but our route to the pass above Cobalt Lake was nothing but rock and boulder hopping mixed in with loose rock. Rating: Class 3 GPX File Google Maps Location Bugaboos Route Map. Approach in light purple. Eastpost Spire in red. Cobalt Lake Pass in dark purple. Road Conditions and Chicken Wire I have long dreamed of going to the Bugaboos. Ever since I saw photos of the incredible glaciated granite spires in the Canadian Wilderness I knew I had to go. The Bugaboos are almost other-worldly. They sit deep in the northern Purcell Range and are vastly different to the surrounding mountains. It's almost as if someone planted a group of glaciated granite spires directly in this wilderness. When we saw them for the first time I couldn't help but yell out. They are bloody inspiring. As with most things these days, when something gets hyped up a lot it seems to not fully meet expectation. Such was the road conditions leading to the trailhead and the chicken wire fence to prevent porcupines from eating your brake lines. This summer, Alex and I rented a low clearance 2wd car. When I read trip reports on getting to Bugaboo Provincial Park, most people said the road was not suitable for a low clearance car. We had no issue. In fact, we actually thought it was good. There is a section in the very beginning that is not great and I would say to go slow. But other than that, it was perfectly fine. Secondly, the chicken wire. There is apparently a history of porcupines eating the brake lines on cars in the Bugaboos. If this is true, that would suck. Big time. I bought into the fear and was a bit anxious but, as I read online, there was plenty of chicken wire that is provided at the trailhead to wrap your car. When we showed up, there was none. Apparently the park service got rid of at all. The majority of the cars didn't have any protection so we said our usual, "fuck it - everything is always fine" and got underway. Approach To Applebee Dome Campground The sun was hot and I was grateful we weren't carrying ice axes, crampons, a full climbing rack, two sixty meter ropes, and seven days of food. This seemed to be the standard of the climbers we saw on our trip. Heavy packs and getting after epic routes. Our plan was the opposite - hike in light, scramble up a peak or two, and call it a mission. The forecast for the upcoming days was calling for rain and we were there for the two sunny days. We bid our brake lines good luck and made our way to Applebee Dome campground, sitting roughly 3,100 feet above the parking lot. The approach was uneventful but beautiful. The trail wasn't shy of going straight up. About 2,200 feet above the valley floor we reached Kain hut and paid for our stay. From there, we reached camp three hours from the car park. We checked out a variety of different spots to pitch the tent and eventually landed on one we were stoked on. I've gotta say, they aren't messing around with this alpine camp. There were boxes to store food and gear, places to hang your things away from rodents, access to glacial fed water... I can understand why climbers lug 7 days worth of food up here. This place is epic. A climbers mecca. I will return here one day for bigger climbs. Camp Alex and I set up camp, cooked dinner, took photographs, and chatted with an Alaskan climber with an eccentric personality. Right above camp sat our objective for tomorrow. I read there was a "4th / 5th class move with a lot of exposure" and I was wondering how it would turn out. Eastpost Spire We woke up early to see the alpenglow hitting the granite spires. A sign of a good day ahead. From camp, there are two obvious access gullies to Eastpost spire. If one goes climbers left, it will become technical. We went climbers right (see route map). Alpenglow on Snowpatch Spire Once you reach this col, the climb begins by ascending the obvious ridge sticking mainly to the climbers left of the ridge. The climb was very straightforward with basic scrambling. At times there is exposure but the rock is excellent with many easy handholds. The route was also heavily cairned which made navigation simple. Just below the summit we reached the crux. Many trip reports will describe this move as class 4, some even low class 5. Personally, I'm not sure nor do I care that much to discern between class 4 or easy class 5. At this point it becomes very subjective and if you fall on either you're in big trouble. I started up the crux and the climbing was very simple. The rock quality is excellent and there are many spots for hands and feet. To be honest, I didn't even know it was the crux until I was standing on the summit just a few minutes later! If you asked my opinion - this was class 3 scrambling because you could down climb the crux facing outward (away from the mountain) and it never became even close to vertical which is typical when you enter class 4 terrain. On the summit of Eastpost Spire I called down to Alex to start up and he made easy work of it. Now we were both on the summit admiring the granite spires. It took us maybe 45-minutes or so to reach the summit from camp. We started our descent going one at a time. The down climb presented no major difficulties and we were past the crux heading back to the col. The summit of Eastpost Spire Cobalt Lake Pass Once we had made it back to the col we decided to drop down off the backside and head towards the pass that overlooks Cobalt Lake. I would argue this section was harder than the Eastpost spire crux. It was extremely steep with very loose rock. A fall here would be very bad. I went first, kicking off huge rocks. I had a brief "oh shit" moment where I was thinking about turning around, but eventually found a way down. Alex came down next, hating it just as much (authors note: I've left this section off of the GPX track and route map. It is not recommended). Once out of this scree gully we made our way down to a basin by sliding and post holing through snow. From here we rock hopped for the next 3-4 hours going to the pass and back under a scorching sun. There isn't too much to report here - the terrain was awful and the view wasn't one to dream about. We made our way back to camp by heading up the col between Eastpost and Crescent Spire (different col - see route map). Here are hard efforts were rewarded - the view was simply spectacular. We had a view right above the glacial fed lakes staring at the incredible Bugaboo and Snowpatch Spire. It is one of the most amazing views I've seen in a long time. Howser Spire towered in the distance like the Lord of the high peaks. Epic Bugaboos This view felt like the moment of the trip. The moment of a long drive, a hot sun, and two days hard days all coming together to give you that drip of reward. The drip that keeps one coming back to the mountains over and over in hopes to quench the thirst. From here, we made our way back to camp. We packed our things and made the walk out, being sure to take an ice cold dip in one of the glacial fed pools just below Conrad Kain Hut. Happy days... Authors note: our car was fine. Everything is always fine.
- Mount Proctor
Date: July 30, 2023 Location: Fernie, British Columbia, Canada Total Trip Distance: 13.29 mi / 21.38 km Total Elevation Gain : 4,700 ft / 1,433 m Trip Duration: 7 hours 11 min Team: With Alex Catalfamo Field Notes: A straightforward hiking loop to one of Fernie's most popular summits. Recommended to go counterclockwise. No water on route until Fairy Creek Falls in valley bottom. Rating: Class 1 Download GPX File Google Map Location Mount Proctor Route Photo Mount Proctor Loop Trail After Alex and I did a 3-day trip in Yoho National Park the previous weekend, I wasn't feeling as inspired to do something big again. I took a rest day on Saturday while Alex scrambled up Crowsnest Mountain. We were both keen to do some hiking, rather than scrambling, so we decided on the Mount Proctor Loop - just a two minute drive from our house. We drove over to the trailhead at Fairy Creek Falls where there is an easy to follow and well maintained trail up Mount Proctor. There are two ways to go up Mount Proctor, either clockwise or counterclockwise. We decided on the later and I'm glad we did. The trail is straightforward. Follow the signs for Mount Proctor the entire way. In the beginning, there is a mix of mountain bike trails as you ascend, but we just simply followed the signs for Mount Proctor. Fairy Creek Falls trailhead The trail switchbacks up through the forest until eventually meeting a ridgeline with a bench. The trail was straight up the entire way, without much of a break. The trail is quite efficient - we climbed 4,500 feet in about 5 miles. Gratefully, it's not a punishing 4,500 feet. It's relatively gradual the entire way as the elevation is spread out over the 5 miles. Once we met the bench, we followed the trail along the ridgeline before it drops down into the forest one last time. From there, we met the summit ridge and climbed the final 1,000 feet to the summit. It took us exactly 3 hours and 9 minutes to reach the summit from the trailhead with only about 5-7 minutes or so of water breaks. Lizard Range, summit Mt Proctor There were solid views from the summit and we met two friendly Japanese women who were stoked to be up there. We had a quick PBJ and didn't hang around too long. There were flies everywhere. We snapped a few quick photos and began our descent. The trail loops and drops down into a basin under the looming Three Sisters. On the map, there is an alpine tarn that I was hoping to take a quick dip in but it was completely dried up. In fact, there is no water on this entire route until you reach Fairy Creek Falls at the end. I wish I had brought a bit more than 2 liters of water. I drink like a camel but it was also very hot with a descent amount of elevation gain. The descent to the valley floor was relentless. Straight down for 4,000 feet in the baking hot sun. I am very glad we did not go this direction because the cold plunge we took in Fairy Creek Falls to end the day was spiritual. Alex and I absolutely love cold water. We take cold showers and plunge into the Elk River daily. Fairy Creek Falls was cold and the feeling was amazing. I'm addicted. Hiking out past Fairy Creek Falls We chugged a liter or two of water (yes, chugged) and walked the final 20 minutes back to our car under an encroaching thunderstorm. All in all - a solid day. This is a very nice loop trail that makes for great training for bigger days. Happy days...
- Three Sisters
Date: July 16, 2023 Location: Fernie, British Columbia, Canada Total Trip Distance: 15.5 mi / 25 km Total Elevation Gain : 4,590 ft / 1400 m Trip Duration: 8 hours 40 min Team: With Alex Catalfamo Field Notes: We found a pullout to park our low clearance 2wd car just past Hartley Lake. Plenty of water on the approach. Didn't see anyone on the Old Trail (the route we took) so might be a good option if one is looking for solitude. Rating: Class 1 Download GPX File Google Maps Location Three Sisters Route Map Approach Via Old Trail Three Sisters is a striking mountain that looms above the town of Fernie in British Columbia. When Alex and I first arrived in town, we knew it had to be climbed. It stands at 9,150 feet in elevation and dominates the landscape. With Saturday being completely smoked out due to wildfires, we woke up Sunday to clearer skies and decided to have a go for the summit. There are many different routes to this mountain but we decided on going via the Old Trail just past Hartley Lake. This road was a bit rough for our low-clearance 2wd car, but we went slow and made it to the trailhead just fine. We found a small little pullout for parking just past the turnoff to Hartley Lake. The trail started off on a 4wd track for a few miles before eventually turning into trail that ended by a meadow. From there it climbs very steeply up out of the valley to the treeline on the slopes of Three Sisters. At this point we realized it was going to be a long day. The trail was quite rocky and the sun was very strong. The Old Trail - Three Sisters On our map (as you can see in the photo of the route), there seems to be a shortcut to the col between Bisaro S4 and Three Sisters, but we didn't find it. We continued following a rough trail and cairns that linked up with the Mountain Lakes / Heiko trail. This took us to the col. We assessed the straightforward route up Three Sisters, drank some water, ate a quick snack, and began the final 1,600 foot climb to the summit. Mountain Lakes / Heiko trail Three Sisters Summit The climb from the col is vert straightforward. It climbs at a moderate pace and there was only one time where I had to use my hands. It's a hiking trail, not a scramble. There were a few moments where I was feeling quite over it, mostly due to the heat and that my left calf was cramping up. Once on the summit, those feelings vanished. The views from the summit of Three Sisters are magical. There are views in all directions. One is able to see the True Mount Fernie , Mount Proctor , the Crowsnest Range, he Lizard Range, Top Of The World Provincial Park, The Purcell Mountains, and more. Mount Bisaro was the crown jewel of the views - it is massive. With heavy wildfire smoke just 24-hours earlier, we were very grateful to have clearer skies to take in the views. It felt like a rite of passage to climb this peak while living in Fernie for the summer. The Lizard Range, British Columbia We signed the summit register, took a few photos and began the long descent back to the parking lot. We took the exact route the way we came, following the Mountain Lakes / Heiko trail and then making a right back to the Old Trail. It would be one of the hottest days of summer. We felt it so we ended the day with our ritual cold plunge in the Elk River and promptly ordered from our favorite restaurant in town. Happy days...
- Mount Daly and Mount Niles
Date: July 21 - 23, 2023 Location: Yoho National Park, British Columbia, Canada Total Trip Distance: 23.89 mi / 38.44 km Total Elevation Gain : 8,063 ft / 2457 m Trip Duration: 3 Days Team: With Alex Catalfamo Field Notes: This trip can be completed in 2 days, but we opted for 3 to have a slightly less aggressive pace and to spend more time in the mountains. While none of the scrambling is overly difficult, the terrain on Daly is very loose and steep so I would strongly recommend a helmet. There is plenty of water where we camped. There was also water flowing just past the Niles glacier before the ascent up Daly. Rating: Class 3 Download GPX File Google Maps Location Mount Daly and Mount Niles Route Map Niles Meadows via Sherbrooke Lake After tossing around a variety of different ideas for a 3-day weekend, Alex and I finally settled on a trip to Yoho National Park. This was our first time in this park and it did not disappoint. With a perfect forecast, we made the three and a half hour drive from Fernie. We arrived at the trailhead, had a quick PBJ, strapped on our packs and began the 6-7 mile approach to Niles Meadows. The approach is easy with a defined trail the entire way. You steadily climb a few hundred feet on the way to Sherbrooke Lake. From there, the trail continues on the hikers right of the lake. I couldn't resist a quick swim in the beautiful water. From there the trail meanders through meadows, steadily climbing through forest. No need to carry much water as you are never far from it during the entire approach. Approaching Niles Meadows At last we reached Niles Meadows where we were greeted with a beautiful view of Mount Niles. It was wet in the meadows so we decided to expend the extra energy and climb another 500 feet. I'm glad we did. The views were amazing, it made the climbs shorter, there were (slightly) less bugs, and we had water in abundance. Climbing above Niles Meadows to camp We set up camp, cooked an entire box of pasta, and hunkered down for the night. As the sun set, we were treated to an incredible thunderstorm that passed directly overhead. Mount Daly There are some days where the numbers don't tell the full story. While only 7 miles and 3,200 feet from our camp, Daly was a pig. We crawled out of our sleeping bags around 5:30 after sleeping for maybe an hour or two. The sunrise was beautiful and I soaked it in while drinking a hot coffee. By seven we were ascending the ridge above camp. From there, we crossed the basin between Niles and Daly. The terrain here was okay and we made decent time. We decided to avoid the glacier as we didn't have spikes. I don't think there would have been any difference in time savings either. Climbing above camp in the basin below. Mount Ogden behind. After crossing the basin, we climbed up to reach a col between a small cone summit and the slopes of Mount Daly. What took place for the next two hours was endless scree grinding and loose rock hopping. It was some of the worst terrain I've ever been on. Maybe I just haven't spent enough time in the Canadian Rockies. The terrain was quite loose and very steep - I'm glad we wore helmets. In reading route descriptions prior to the trip, there was mention of a "class 4 scrambling crux" when one reaches an obvious rock band after climbing above the small summit cone. The rock band is obvious, but we decided to sidle to the climbers right and found very easy slopes we could simply walk up, although still very steep and loose. Once passed the "crux", we climbed another 800 feet where we reached the false summit. Some maps may mark this as the official summit, however, the summit register is on the other peak a mere fifteen minutes away. To me, it is well worth it to climb the ridge between the two summits. It's airy and has an exposed move or two that adds some flair to the trip. The climbing is easy. In my opinion, this was the "crux," although it's nothing more than exposed scrambling with perfect rock. Alex reaching the false summit of Mount Daly The views from the true summit are spectacular with mountains in all directions. It is definitely a remote peak - there were on average five to six successful summit parties (that signed the register) per year. 2021 only saw four. In 2023, we were the third. We felt extremely lucky to stand on this massive peak. An exposed ridge on Mount Daly with the true summit behind. After snapping some photos and signing the register, we made the climb back down to camp. I found the descent to be quite frustrating. You couldn't trust a single step. It felt like every rock would shift or move under my feet which resulted in a slip or two. Secondly, the sole of my right boot was getting torn off and Alex's shoes were getting holes in them. The Canadian Rockies were eating our footwear alive this summer. This doesn't do it justice - the terrain was steep and loose. Care had to be taken on the descent as rocks would release and create hazard for the climber below. We decided to fan out and take our time. Incredibly, we saw a party of two climbing Daly as we descended. They were quite keen, deciding to do it in a day. Our last difficulty was descending the scree back down to the col between the cone shaped summit and Daly. We did of a combination of down climbing and sliding, roughing our hands in the process. Eventually we made it back down to the basin and and hustled back to camp where we soaked in the ice cold tarn near camp. Mount Niles I was thrilled to get close to six hours of sleep. By four in the morning I was out drinking coffee under the last of the dying stars. The weather was perfect. By 5:30 we had left camp and were headed towards Mount Niles. The route is easy to follow and within fifteen minutes we found ourselves at the base of the climb. Ascending a steep loose scree gully on Mount Niles We ascended the obvious scree gully for about 500 feet and then climbed up to the right to gain a ridge. From here, we ascended steep but easy slopes to the summit. There was a rough path the entire way and navigation was easy. As we ascended, alpenglow baked the mountain tops. Reddish-purple light gradually morphed into golden light and our souls did the same. Is there anything more pure than standing on a summit of a lofty peak with a good mate at sunrise? The views from the summit were spectacular. Climbing Mount Niles at sunrise. Sherbrooke Lake and Mount Victoria behind. The climb from camp was short and steep. We reached the summit in one hour and thirty minutes and the descent took roughly forty-five minutes. Under a barrage of black flies, we quickly packed camp and made the three hour walk out back to the trailhead. Happy days...